Buy PodPillows!
Categories
Archives
Bernina Aurora 440 QE: Free-motion Quilting – Part 1 of 2
Update: For part two of this series, go here: Bernina Aurora 440 QE: Free-motion Quilting – Part 2 of 2 – The BSR!
I’ve been sewing for a bunch of years, but have always admired from afar the meandering amoeba-like quilting stitch that some people use on top of their quilts. It sounds and looks quaint enough, but did I need special feet? Special thread? Special talent? Was this all done in some secret pattern that I didn’t know about? Was it done by hand and would I be too lazy to ever do this myself? Thankfully, the answer to most of those questions (including, most importantly, the talent question!) is no. As I’ve been learning, there’s actually nothing scary about this technique, and it turns out it’s extremely fun.
I invite you to come on my little trip through free-motion quilting as I learn about this technique in two parts: Part one will explore the free-motion quilting technique that can be done on any sewing machine; part two will focus on the use of the Bernina Stitch Regulator (BSR) attachment to regulate the stitch length while free-motion quilting on a Bernina sewing machine. Welcome to part one! Let’s get started.
Getting the Important Details Out of the Way
First let’s answer the most burning question that I just know has been bugging you as much as it has been bugging me: Hyphenated or not? “Free motion quilting?” or “Free-motion quilting?” I’m glad you asked because I can hardly stand it anymore. Based on Google search results, you can find many instances of both versions, though I’d say that the unhyphenated version seems to dominate. Unfortunately, the grammar geek in me wants to disagree. Since neither “free” nor “motion” modify the noun “quilting” alone and act instead as a single concept describing the quilting, the two words must be hyphenated. Grammarbook.com agrees, so let’s go with that for now. Phew! Glad that ever-important grammar diversion is out of the way. Ahem.
Free-motion Quilting Defined
So what is free-motion quilting in all its hyphenated glory? Free-motion quilting is machine quilting (yay) that is done with the feed dogs lowered and uses a darning foot. You make patterns on a quilt (or other fabric sandwich) by moving, but not turning, your quilt. Technically, to do free-motion quilting properly, you are making one continuous line of stitches that never crosses itself. You can decide how strictly to follow these rules; many people turn their pieces or cross their stitching to great effect! Typically, people use free-motion quilting to draw designs or patterns on a quilt, or to fill in areas of a quilt to make the feel of the quilt flat and firm. We’ll see about those things in a minute. For now, let’s walk through this definition step-by-step:
First, it looks like we’ll need a machine. Check! Got that one covered.
Next, we lower the feed dogs. On my Bernina 440 machine, this involved depressing the button on the side of the machine to bring the feed dogs down:
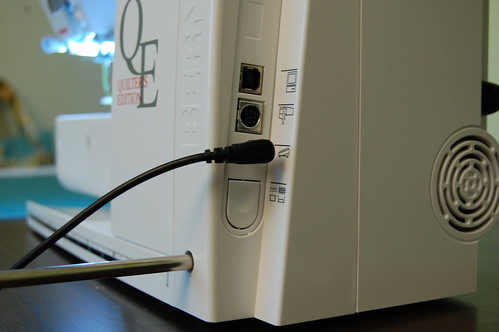
The button sits just below where you plug the foot pedal in.
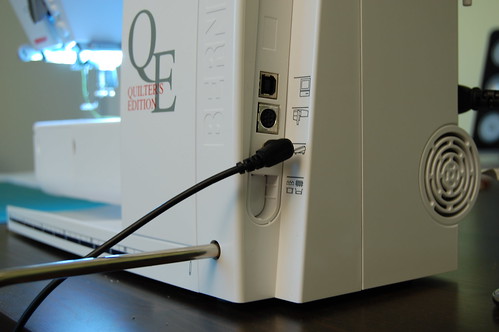
Feed dog button, pushed in to lower the feed dogs!
So far so good! Next, we should reach for the darning foot. In Berninaland, this is the #9 foot. Darning feet have a spring in them, and typically a round or rectangular opening. Sometimes they have an open toe attachment as well. As a random side note for you IP law junkies out there, the darning foot was patented in1951. The diagram and patent describing all of the intricacies that make this foot uniquely a darning foot can be found right here: Darning foot patent. For you visual types (admittedly, most of you out there probably aren’t IP law freaks like me…), a picture of my darning foot is below:
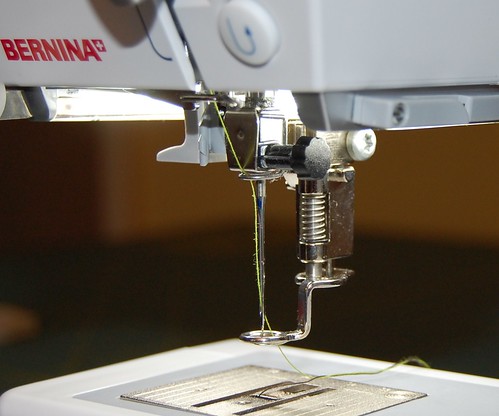
See the springy bit? And the cute circular loop of an opening? Also note how the feed dogs are down. Looks like we're ready to start!
One last thing before we get started actually stitching. I have my machine set to a stitch length of 2, presser foot pressure to very low (almost 0) and stitch width to 0 (straight stitch). Technically, the speed at which you move the fabric around determines the stitch length, but my machine defaults to 2, so… I also leave my machine in the needle-down position so that when I take my foot off the pedal, the needle remains in the fabric in case I need a break.
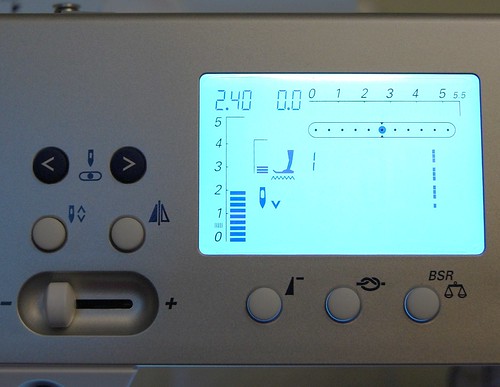
Bernina's settings. Ignore the speed lever, which is currently set to slow in this picture. This should actually be set somewhere between medium and fast.
OK, so now it’s time to place your fabric sandwich underneath the presser foot and lower the lever. If this is your first time doing this, it may feel quite odd. The feed dogs not being there mean that you can move your fabric sandwich around as much as you’d like and there’s nothing to hold it in place. Even though this feels weird, this is, in fact, the key point behind free-motion quilting, enabling you to move your fabric around while the machine stitches for you.
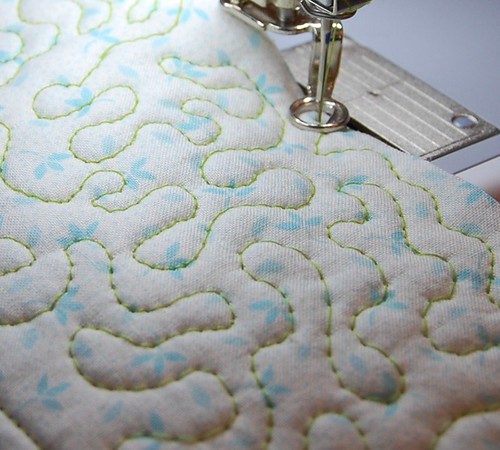
Now, your next task is to press the foot pedal in and off you go! A medium or fast speed is ideal for this technique, but no matter what the speed, it takes some getting used to. You – not the feed dogs – are in charge of moving the fabric around. You can go up and down, side to side, whatever you want! Though per the rules of the game, don’t turn your fabric sandwich and don’t cross your stitching. Often times, people use echoing (or the repeated outlining) of a particular line or pattern to build their meandering free-motion quilting stitch. Here’s a sample of what I did with my fabric sandwich, just meandering around, not echoing anything:
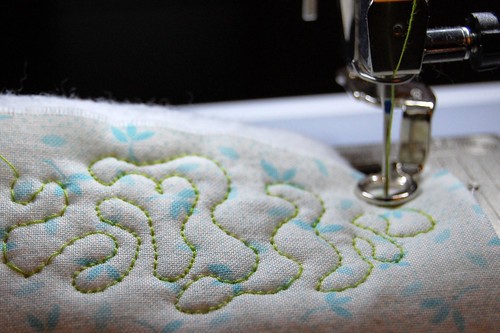
Note that this is one continuous line of stitching, but that I can go in whichever direction I want. Don't cross the lines, though!
See those puffy little areas of goodness? This is my favorite part of the free-motion style. After washing, this often leads to a great wrinkly dense effect. You can also see that the closer together you stitch your lines, the denser and flatter the quilt will lie.
Stipple Quilting vs. Free-motion Quilting?
At first, I thought stippling and free-motion quilting were both the same thing, as they seemed to be used interchangeably. It turns out this is not the case. Stippling is similar to the meandering free-motion quilting stitching you see above, but where your rows of stitching are not more than 1/4″ apart. See a really useful example video of the technique, complete with technical terms like “Mickey Mouse ears” and “mittens” to describe the stitching. Definitely worth a watch.
There are all sorts of things you can do with free-motion quilting. If you’re artistic, you can stitch any number of cool pictures, echo-stitch appliques, or just freeform meander around your quilt until it’s as densely quilted as you’d like. I, as a free-motion beginner, am sticking with the flexibility of the meandering amoeba stitch for a while until I get good at it. Maybe later I’ll get into some fancier stuff soon.
Practice makes perfect
Everywhere I look, I see that the advice to getting good at this technique is to practice. Seems reasonable enough! My approach is to start with small projects before doing an entire king-size quilt. A table runner, maybe, or some quilted coasters? Trivets? You get the idea.
Eye candy
Here are some examples of free-motion quilting to get you excited to try it:
Oh Fransson’s Octopus Baby Quilt and beautiful green quilt; House on Hill Road’s Giraffe and Tea;
Jillions of examples on Flickr, including this adorable toy quilt.
I’d love to hear your tips or see your own free-motion quilting work. Please post some of your tips or links to examples of your own free-motion quilting!
Next up: A peek into the Bernina Stitch Regulator for free-motion quilting! Part 2 of 2.
Posted by robyn on August 3rd, 2008 under bernina 440 qe, crafts, sewing, sewing machines, tutorials


August 4th, 2008 at 5:33 pm
Robyn,
I always learn something new from your wonderful blog entries! I enjoyed your info and photos of FMQ. I look forward to FMQ–part 2. And I bookmarked the “grammarbook” site, as well.
Annes last blog post..Dress Odyssey Prompts Air-Conditioner Repairman to Action?
August 5th, 2008 at 8:42 am
That’s gorgeous! How long did it take you to get the hang of it? I tried free-motion quilting once I got my darning foot, but it was a complete failure. I really want to give it another go though…hopefully soon!
August 6th, 2008 at 1:14 pm
LOVE this entry! Great pictures, great details! Just storing up this stuff until my machine arrives. I am curious though as to why you would not just free-motion quilt with the BSR. I guess I will have to wait until entry #2 to find out. Your free-motion quilting looks GREAT! I am quite impressed.
Do you think that doing this on a king size quilt is possible? Where is all of that yardage going to go when you want to get to the middle of the quilt? Curious, curious.
CJs last blog post..A confession and a plea for help
August 7th, 2008 at 10:48 am
@ Kristine:
Thanks! Honestly, this was really my second or third try at FMQ. I’ve never done any on a real item, just a couple of little scraps like this one. There are plenty of inconsistencies yet in my attempt, though I hope I will get the hang of it soon!
August 15th, 2008 at 9:06 am
[…] See Part 1 of this series here: Bernina Aurora 440 QE: Free-motion Quilting – Part 1 of 2: Free-motion quilting basics without the… […]
August 15th, 2008 at 2:29 pm
Loved your review! I’ve only tried the BSR once and I liked it as well, but it seemed much more interesting reading your way through it. I will keep your blog listed as a daily visit.
August 16th, 2008 at 4:10 pm
@ Carol:
Thanks, Carol! I’ve had a lot of fun exploring the machine. Thanks for the visit!
August 17th, 2008 at 12:31 pm
Hi – Just wanted to say I stumbled upon your website in my search for information about the Bernina 440QE – I’m trying to find out exactly WHAT the BSR is and how it works. The information you have listed is great – Thanks! (Now, I’ve got to decide if I can afford to buy one or not….maybe the local quilt show will let me trade in my 153QE…)
Also, I love the other categories you have listed and Banjo is the icing on the cake – just GREAT!
Thanks again for the info!
January 23rd, 2009 at 6:33 pm
Thanks for the great info.
April 15th, 2009 at 7:00 am
How do you re-calibrate the BSR?
August 25th, 2009 at 5:11 am
You are my heroe! Bernina should pay you for the magnificent job you’ve done explaining and illustrating the machine quilting capabilities of the 440. I can finally stop procrastinating and start machine quilting all the baby quilts I’ve been sewing. My calloused hand quilter’s fingers thank you too!
September 17th, 2009 at 5:34 pm
Great website! I have a question for you about your Bernina Aurora 440 QE, Robyn. I own one, too, and I can’t figure out how to set my machine to always stop in the needle down position while I’m free-motion quilting. Can you help me?
February 20th, 2010 at 10:04 am
Dear Robyn,
Your posts on this BSR has saved me from further headaches. I have wasted hours trying to figure out where I went wrong till I came upon your blog!…. Thank you so much! Years after you posted this, it is still so useful to others!
Happy Chinese new Year
& have a wonderful weekend, Robyn! – Xue
December 17th, 2010 at 1:48 am
Up until today I thought there wasn’t a difference between stippling and free motion. I watched the video! That was VERY helpful….I think I can do mickey Mouse ears and mittens!
You’re the best!
November 4th, 2011 at 10:22 pm
Hi and thank you thank you thank you !! Working on my first BSR attempt and ran into well it not working !!! I read the booklet I read the book and then I googled and found “You” !! Yay and thank you sooooooo much. Where are you now ? Did you start a new blog ? Hope you come back on soon !! Really very well explained and would love to have more tutorials by you.
December 20th, 2011 at 8:53 am
Gorgeous stitches with your #9 foot! And as a beginner?! Bravo! on the FMQ and your superb blog and tutorials.
May 24th, 2012 at 6:21 am
HAHAAHAHAHA — Girlfriend, you and I are kindred spirits. I love it that you consulted the grammatical gods about the hyphen in free-motion quilting! I get so freaked out about grammar that I made a secret pact with my children: If they catch an adult using pronouns incorrectly (such as “Me and George are going to the ball game” or “Cheryl and myself are coordinating the school talent show”) I will pay them $20. We were sitting in church last week and the pastor slipped up during his sermon. Two little boys’ heads snapped around and their eyes lit up like Christmas trees!
Rebecca Grace´s last blog post ..Quilting Inspiration From End of Grade Exam Proctoring
July 17th, 2012 at 5:28 pm
Thank you thank you thank you, I bought my 440Qe it was a sales model, and They have cancelled my class on me twice. I am so happy to have stumbled onto your blog.
June 3rd, 2014 at 4:26 pm
Thank you soooooo much, I am scared of the quilting part of patch working and with your very helpful instructions I am going to give it a go. Thank you again.
October 18th, 2015 at 12:04 pm
What do you have pressure foot set at when using the stitch regulator? Also, do you change the tension?
November 16th, 2015 at 11:12 am
Is there a way to set the 440 QE sewing machine to stop with the needle in the down position?
June 6th, 2016 at 7:27 am
I want a BERNINA