Buy PodPillows!
Categories
Archives
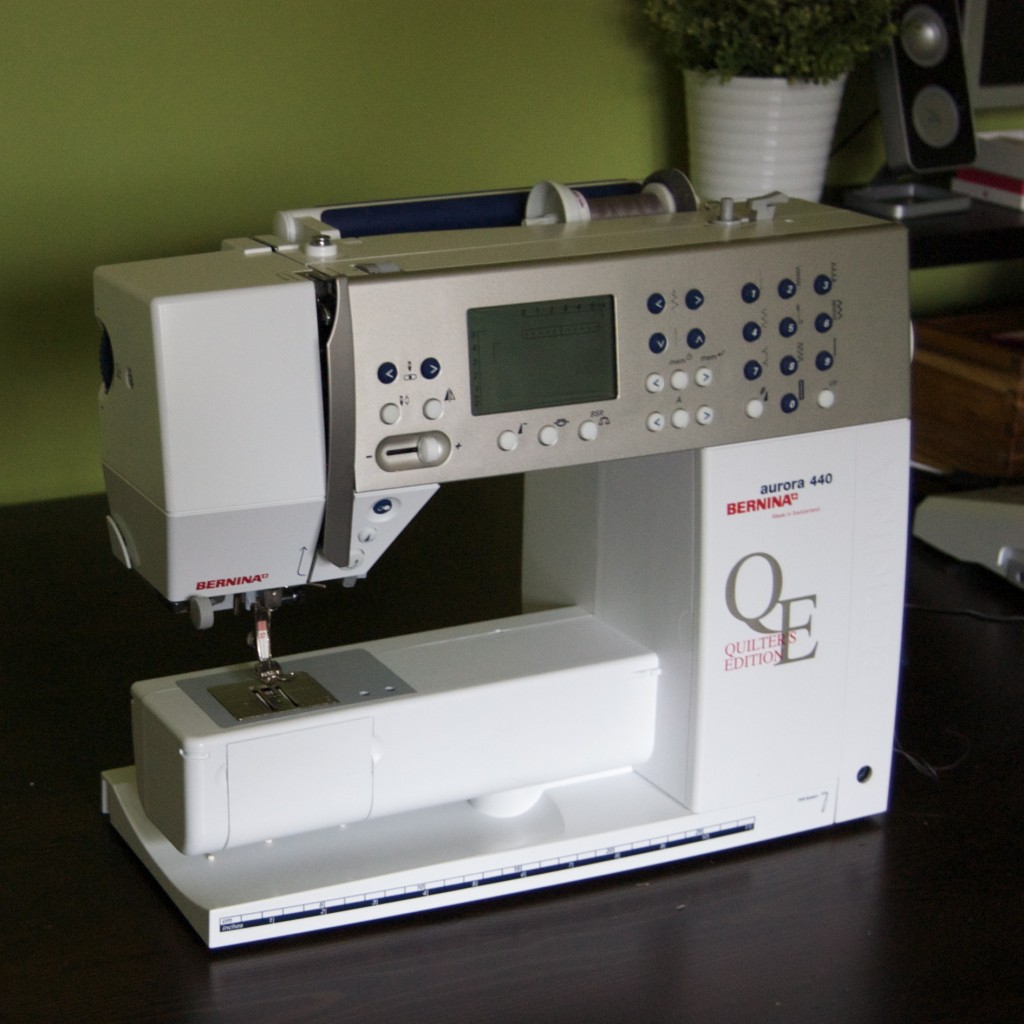
Bernina 440QE: Cleaning and Oiling Your Machine
Each year around the holidays – or more specifically, while I’m in the middle of the holiday sewing craziness – I lament about how infrequently I manage to perform the maintenance that I know my machine so desperately needs at this time of year: cleaning and oiling!
First, the procrastinator makes an appearance: “Just one more bobbin.” or “When I’m done with this quilt!”
Next, denial sets in: “Wow, where are all these fuzzies coming from? Must be this batting.” or “Really, I’m sure that ca-chunk-ca-chunk-ca-chunking is just the dishwasher.”
But the dirty dishes are still piled up, and your projects continue to flow through the machine, one after the other. And you don’t do it. Or at least, I don’t. Not nearly enough.
But there’s no excuse! It’s so easy and takes about 3 minutes. Below are the steps for you to do it yourself. At least someone will be cleaning their machine, even if I’m not.
Cleaning and Oiling Your Machine
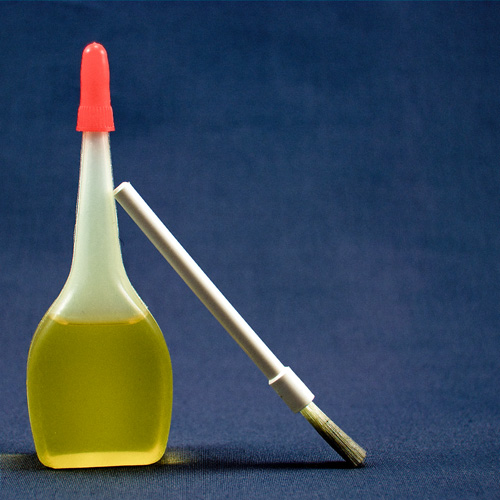
Getting started: Unthread your machine and put it in the “needle up” position. Turn it off. Find your brush and oil. The ones pictured above came with my machine.
Step 1 – Approach: Quietly, gently approach the machine in its native habitat. Speak in soothing tones, so it doesn’t suspect anything.

Hunting for fuzzies.
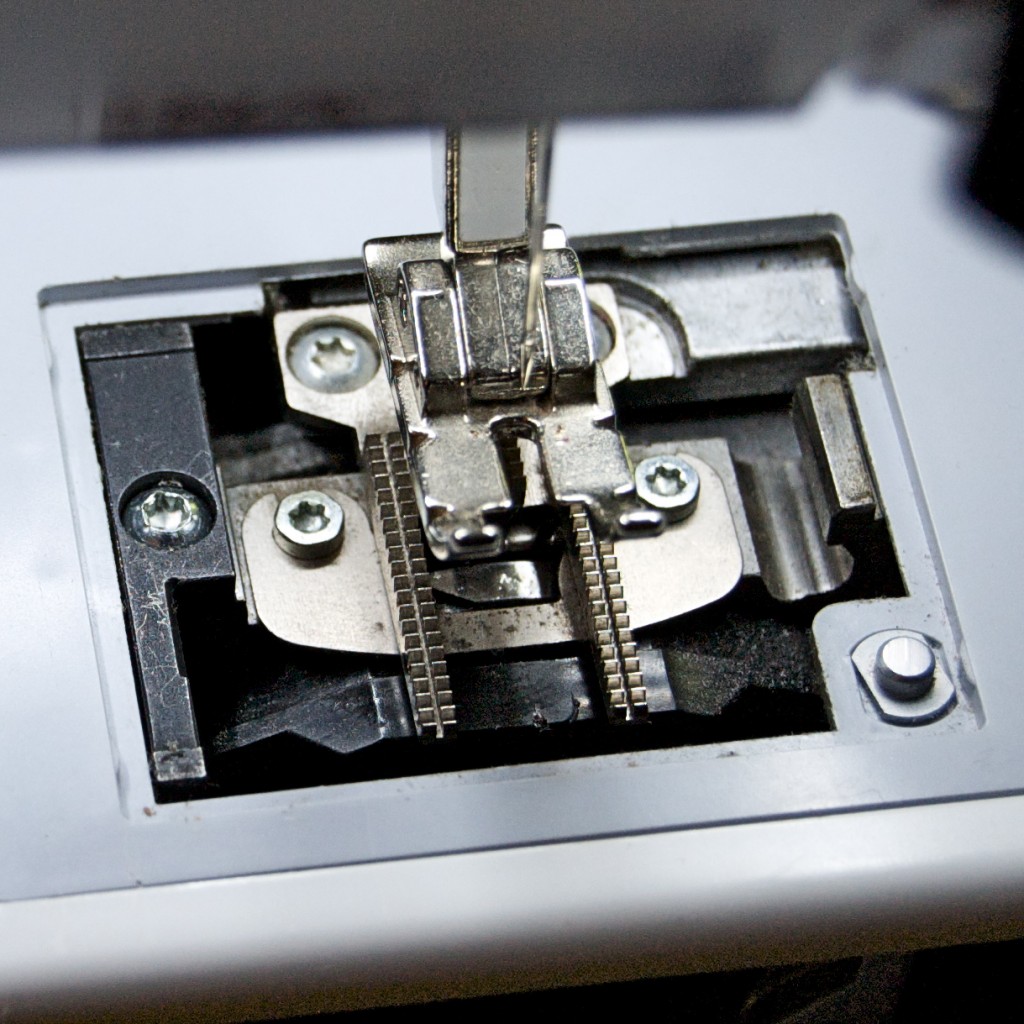
Step 2 – Open the top: Press open the stitch plate beneath the presser foot and remove it.

Run! Here they come!
Step 3 – Defuzzify: Brush out all the fuzzies and gunk, bits of broken needles, toast crumbs, dog hair, extra threads, whatever else is stuck in there:
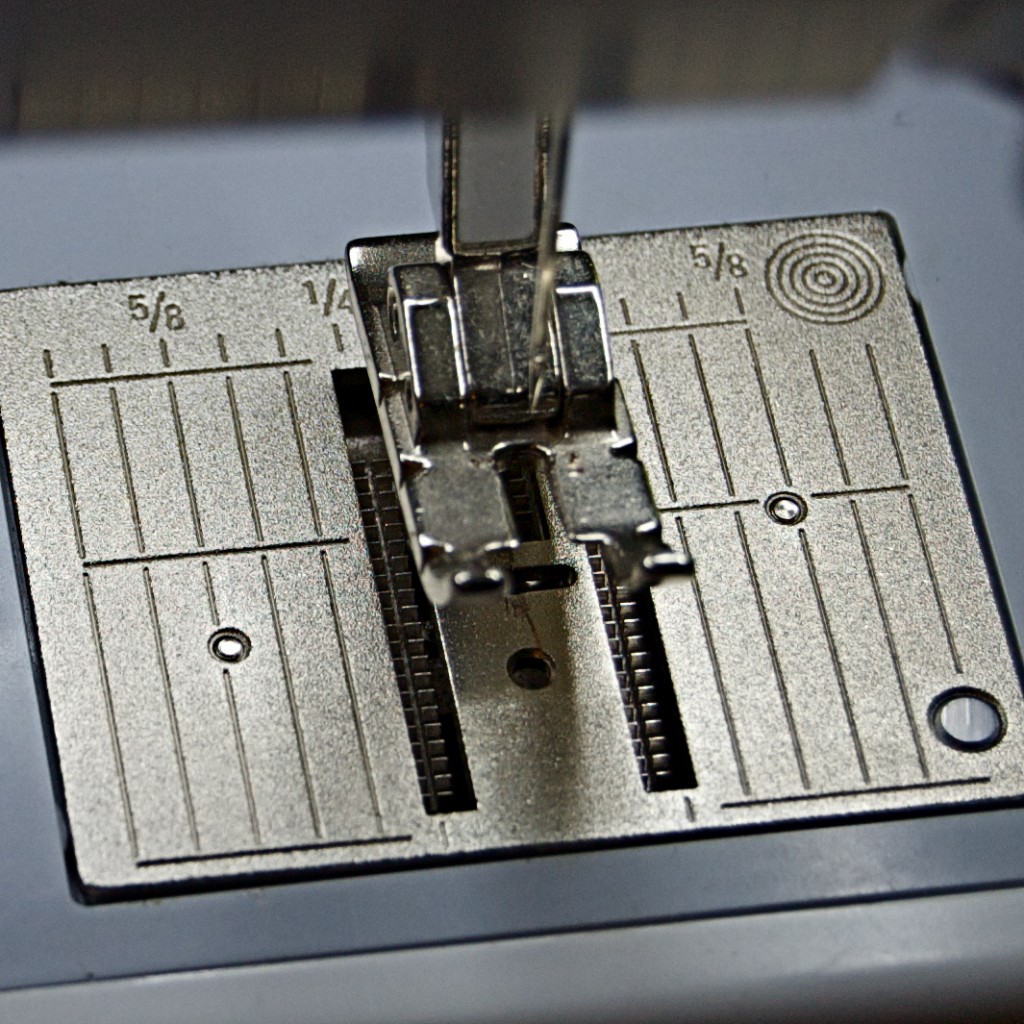
Step 4 – Appreciate: Admire your clean machine top, and replace the stitch plate:
Step 5 – Bobbin area: Open up the bobbin door, and remove the bobbin. Clean out the fuzzies you can see.
Step 6 – Release the bobbin hook: Now, release the housing that holds the bobbin hook in place. There’s a handy little lever on the top left of your machine to release it. Push this lever to the left to release the housing. The housing will flop down:

Press the lever on the top left of your bobbin area to release the metal/black plastic housing. Not so conveniently for this tutorial, my thumb is covering it up.
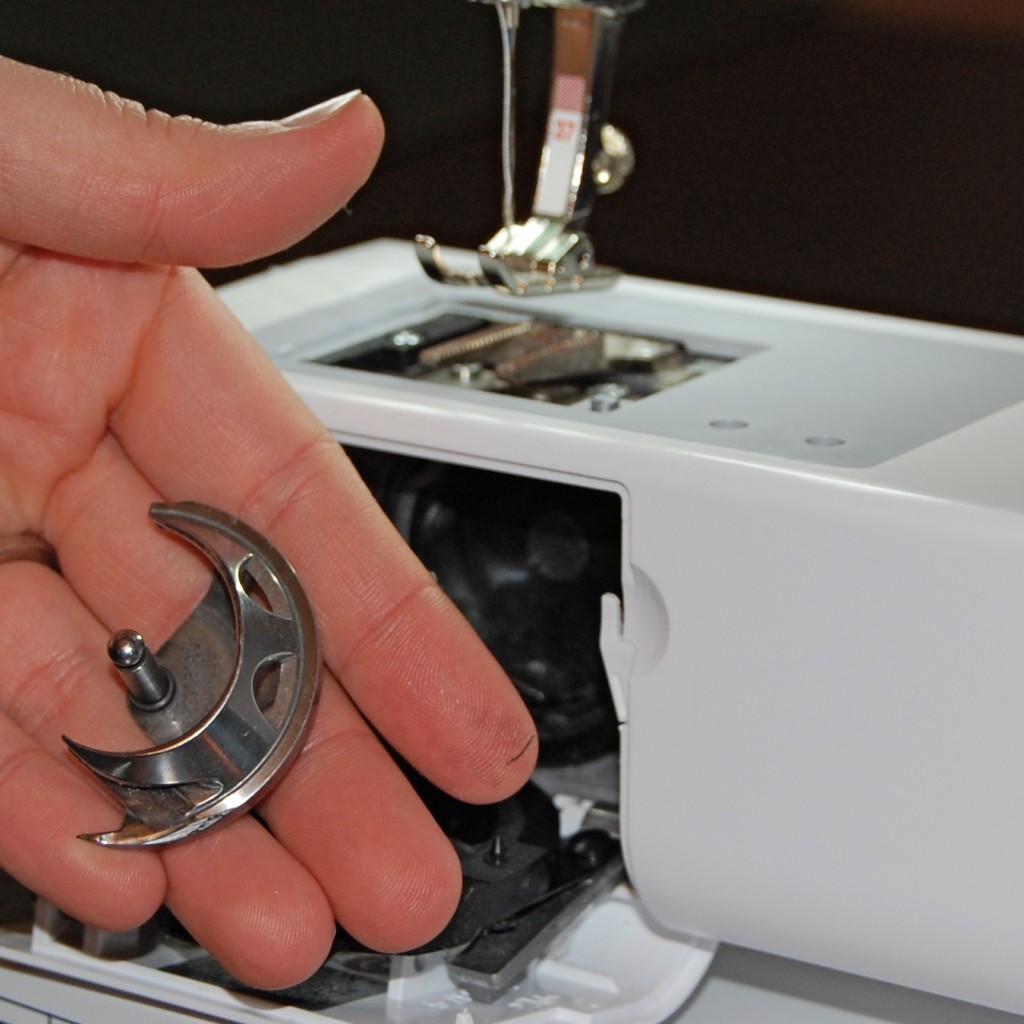
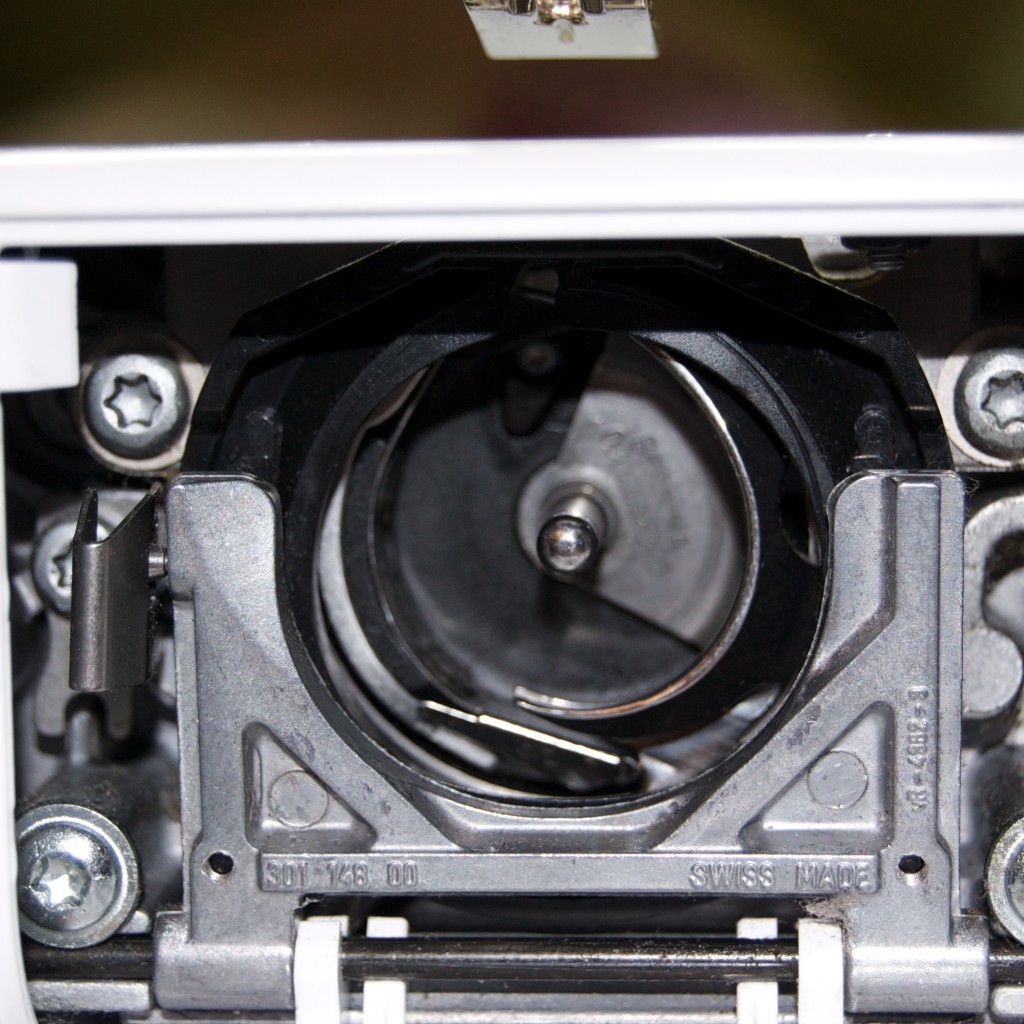
Step 7 – Remove the Bobbin Hook: Open the bobbin housing and remove the spiky part that sits on the right-half of the bobbin area. This is called the bobbin hook. It’s the part that rotates around the bobbin and makes stitches.
This is what it looks like up close:
Step 8 – Clean like the wind!: Now clean out the hook and the rest of the bobbin area with your handy little brush so it looks like this:
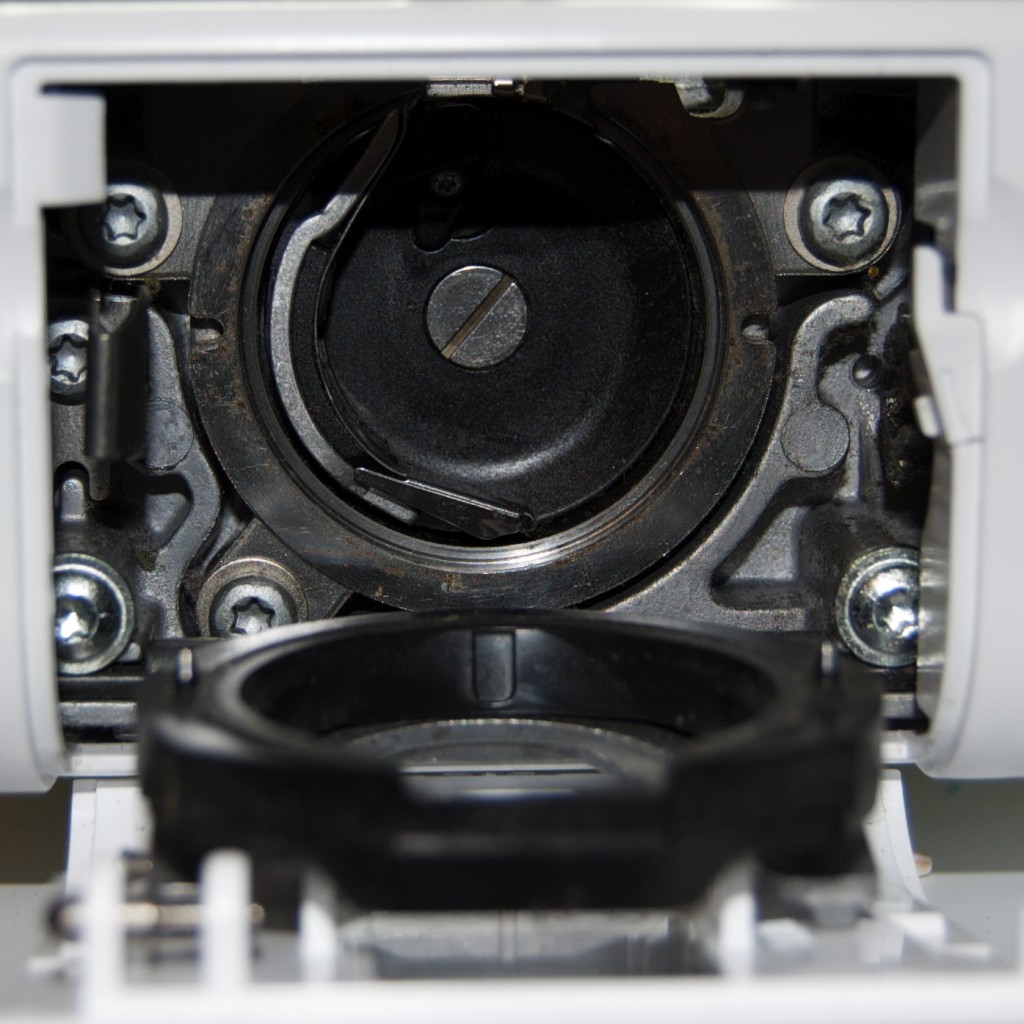
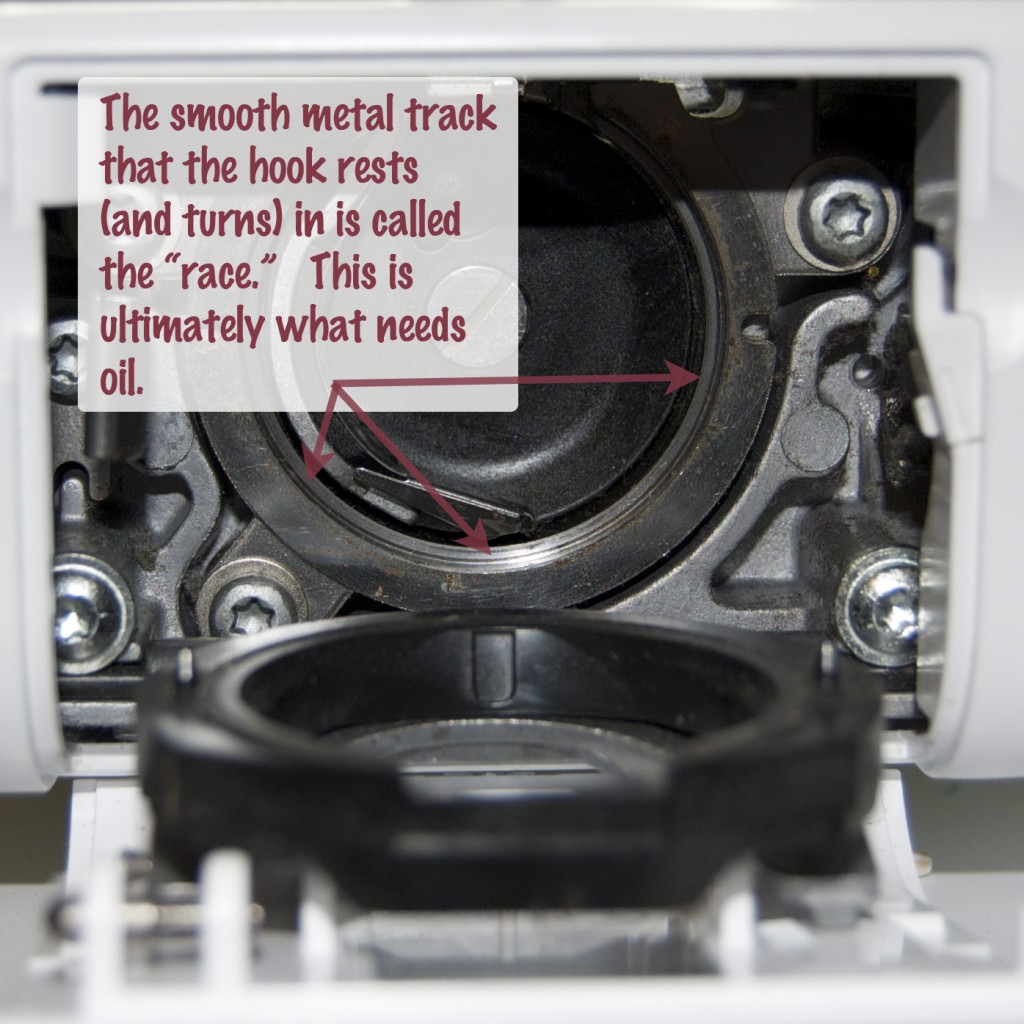
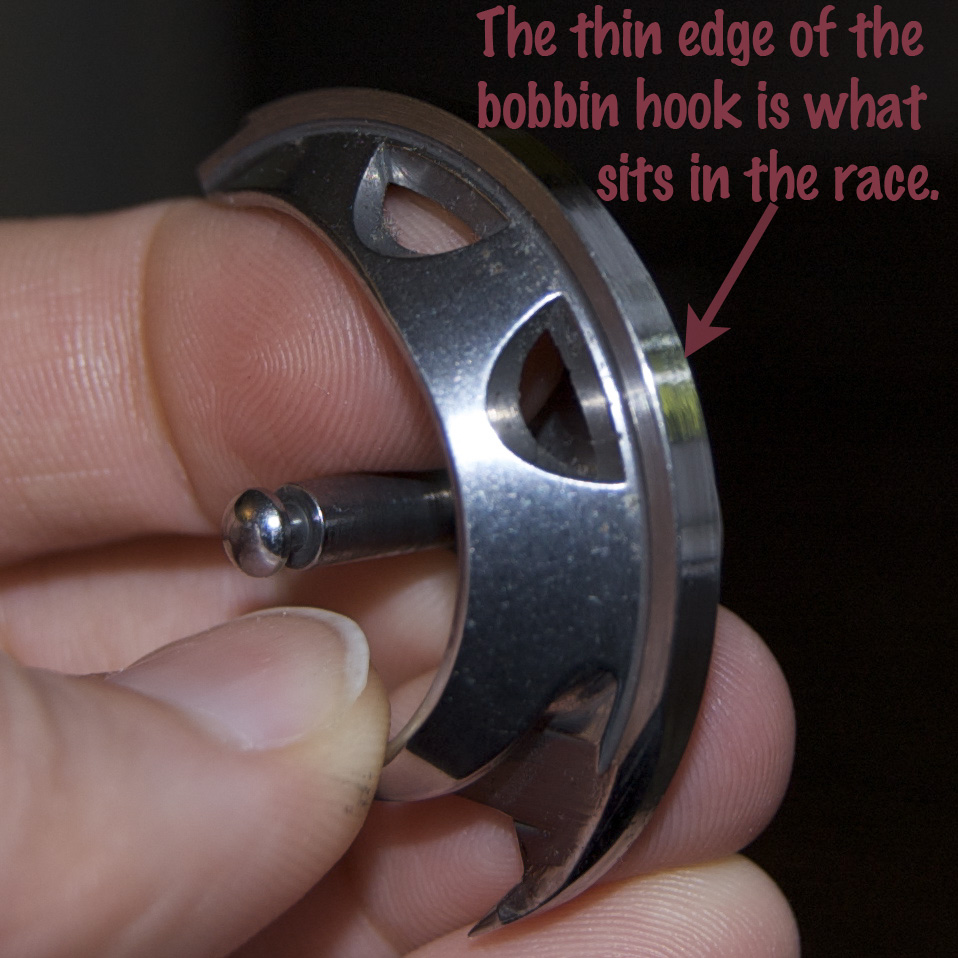
Diversion! – Understanding the inside: Small side trip! The bobbin hook sits inside the housing and “races” around in a circle while you’re sewing to make stitches. The little track that it goes around on is called the race. Ultimately, this is the part that needs the oil on it.
There are two different ways to get oil onto the race. Are you ready? 3, 2, 1…
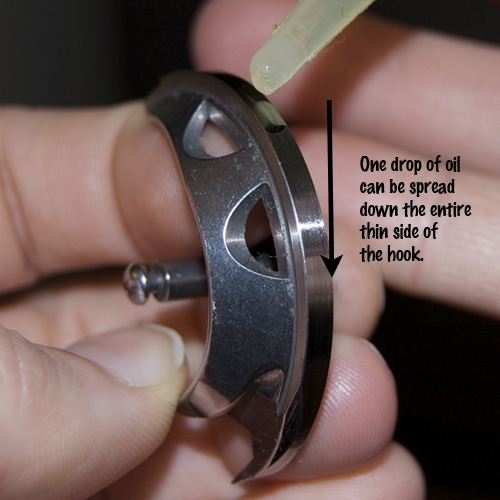
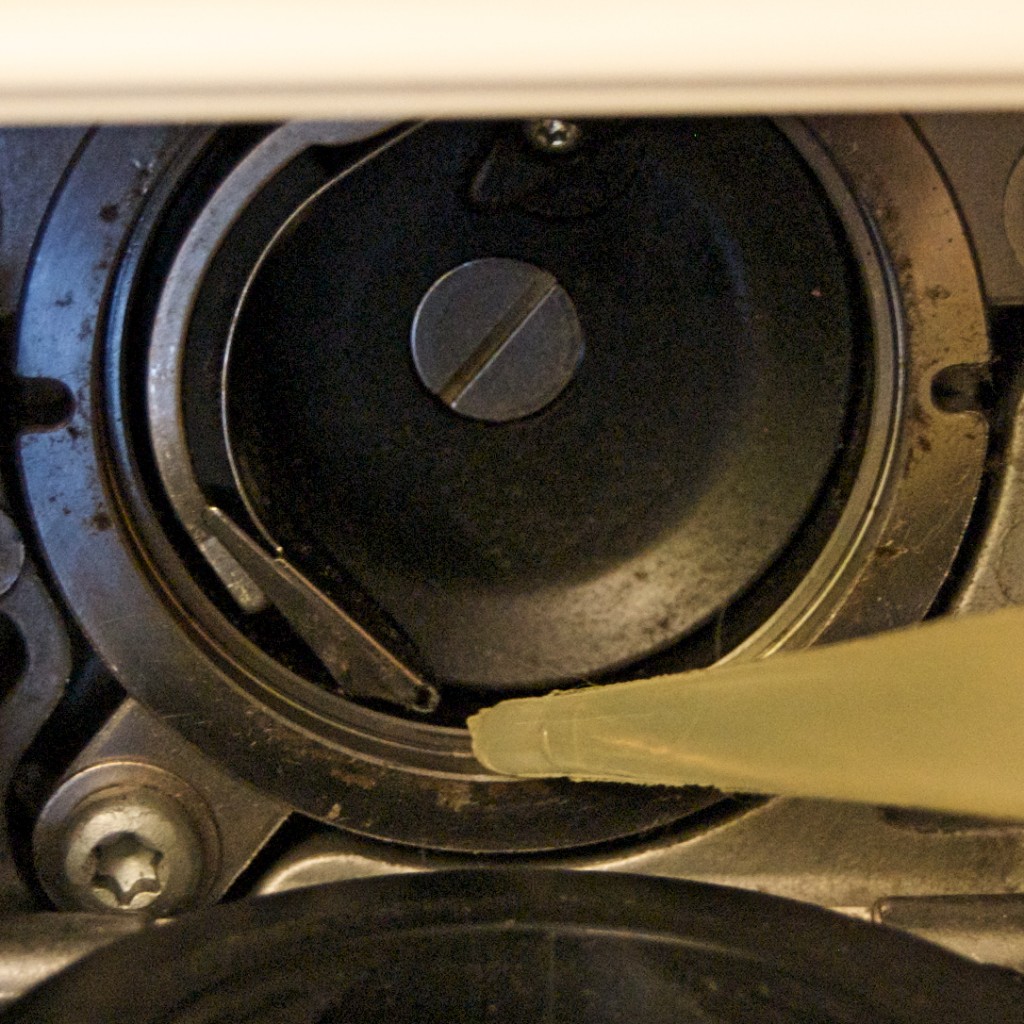
Step 9 – Option 1 – Oil the Hook:
Step 9 – Option 2 – Oil the Race:
Place one drop of oil at the bottom of the race hook.
Please note: You only need to do ONE of the above methods. You DO NOT need to do both. When you’re done with your chosen method, the rest of the steps are the same:
Step 10 – Put Humpty Back Together Again: Reinsert the hook into the race and close the housing again:
Step 11 – Run the machine and listen to it purr: As the hook turns in the machine, oil will be distributed along the race. Run the machine without any fabric in it until the oil is distributed. This saves you from the disappointment of getting a bit of oil on your project as the machine settles in to its new-found lubricated state. Machine sounds better, doesn’t it?
When should you oil your machine?
I’ve heard a lot of different things: Every bobbin, every 3-5 bobbins, at each needle change, every day, never… But my rule of thumb is usually the following:
1) After using up 3-5 bobbins.
2) When it start ca-chunking – sometimes the machine just sounds like it needs oil. When this happens, I oil it. It’s possible that it hits this mark after the 3-5 bobbin stage, and comes from my minor neglect, but I will deny this if anyone asks. 😉
3) When Bernina tells you you should – Bernina will display a cute little oil can icon on the front of the machine after about 180,000 stitches, indicating that it’s time to oil. Almost all the sewers I know oil more frequently than this, but it’s a good reminder to get once in a while, and it’s a cute icon, to boot!
![]()
What you shouldn’t do when oiling: Compressed Air
People say that compressed air is ok for the older mechanical machines that are not computerized. However, most sewing pros I know don’t use compressed air on their computerized machines, for fear of blowing the dust into the internals of the machine and messing something up. I’m not sure I buy it completely, but better safe than sorry! I steer clear of it just to be sure!
Hope this little tutorial was helpful. Happy cleaning!
Posted by robyn on December 31st, 2011 under bernina 440 qe, crafts, sewing, sewing machines, tutorials







February 16th, 2013 at 12:59 pm
Dear Robyn,
I followed your instructions,which are very clear, but unfortunately my machine doesn’t work anymore. It simply doesn’t move or anything. What can I have done wrong?
Could you please drop me a line?
Thank you so much,
Anita
February 18th, 2013 at 4:42 pm
What a great blog! I’m a bit intimidated at the thought of opening up my machine and oiling it myself, but my fears are diminished with the help of your tutorial. Will definitely keep this page open while I’m doing maintenance on my machine.
February 26th, 2013 at 6:50 pm
My mom and grandma taught me all this way back when…I was like 8/10 yrs old. Also be sure to clean and oil the working parts where the needle is.
April 1st, 2013 at 10:01 am
Thank you for your website especially on the tutorials for the Bernina. I bought a used one and I am teaching myself how to use it with the manual and what I can find on the internet. Your tutorials are absolutely fantastic because of your directions, pictures and arrows. Bernina’s directions are very difficult to follow because they use very little punctuation and I have trouble figuring out what part goes which each sentence. I have been outlining the directions and then trying to do each set of directions to find out how to do things. You saved me with the tutorial on cleaning the machine. Thank you again for sharing.
Rita´s last blog post ..Protoquilting
April 3rd, 2013 at 7:55 am
I was at my quilting class Tuesday and the little oil can came up and blinked and the machine stopped working. I was like omg what..it went one or two stitches and stopped. I then oiled her up and she ran like a champ again. I did not have my Bernina oil with me but luckily another lady was there with the exact machine and I borrowed a drop of her Bernina oil. I will bring the oil now every time I bring my machine anywhere. Lesson learned!
Stephanie
July 8th, 2013 at 6:32 pm
I oiled my machine but now it doesn’t work what do I do now
July 8th, 2013 at 6:34 pm
My machine doesn’t work now
July 31st, 2013 at 4:22 pm
Thanks. Is the best tutorials
August 1st, 2013 at 3:49 am
if your machine is still not working maybe you have not replaced all the bits correctly. try again. I have an Elna from 1973 which has only had one professional service in its life – and the technician said it did not even need a service, maybe because i clean and oil often! I sew for craft markets so it is in daily use!
August 7th, 2013 at 7:29 pm
[…] Dog named Banjo […]
September 17th, 2013 at 12:39 pm
Thank you for this excellent Tutorial – I clean the fuzzies regularly but had not oiled – the machine has been noisy for awhile – the oil can came on this morning in the middle of a project and I have misplaced my Manuel (it is buried) – so, I grabbed my iPad and Bing helped me find you. My machine is oiled and happy again – many thanks!
May 14th, 2014 at 12:55 pm
Thank you! My Toyota looks the same on the inside, and I had no clue where to put the oil. That picture of step 9 option one is exactly what I was looking for. Now I can go back to sewing to my crafty heart’s delight! Thank you sew much!
May 19th, 2014 at 9:14 pm
My 440 often makes a noise when I’m making the first stitch after turning it on, almost like it’s having a hard time pushing the needle down. Have you ever had that happen?
May 24th, 2014 at 2:26 pm
How do i turn the icon off.
June 5th, 2014 at 12:07 pm
Hum, this explains a lot I think. Thanks so much for posting. I just cleaned out the feed dogs but oiling never occurred to me.
June 5th, 2014 at 12:32 pm
Check the color of your oil. Newer and better oil is clear. Check with Bernina to make sure your oil is not too yellow and old looking. Also, Bernina oil is a lighter weight oil than those you buy at a big chain store. Only use the oil that your machine dealer recommends!
June 5th, 2014 at 6:01 pm
Robyn,
No sooner than printing these instructions out and my “oil light” came on…I was able to clean and oil my machine thanks to your step by step instructions!
Thank you!
Diane
July 16th, 2014 at 11:42 am
The ladies have said it all. This is best cleaning tutorial for my Bernina. Thank you so much for sharing.
August 3rd, 2014 at 11:21 pm
I hang my head in shame, having owned my bernina for 22 years I oiled it for the first time a few months ago!!! On wednesday it is going in for its first ever service, when I told the man it had not been dine before he asked what I had I told him a bernina 1230 and he said that would be no problem a wonderful machine so fingers crossed it comes back purring, I know it is noisy at the moment but still stitches wonderfully
September 1st, 2014 at 7:29 pm
I have a bernina 165 and my bobbin case won’t lock in place. I cleaned out the area per the instructions and the bobbin case locked to the bobbin hook before I put it back in the race. Is there a specific way to install the bobbin hook into the race? Oh, and I had my needle in the upper most position. Thanks!
November 16th, 2014 at 6:44 am
I am delighted to find your blog. I have just been lucky enough to buy a bernina 440 QE, and your blog has helped me get to grips with this little marvel. Thanks.
November 29th, 2014 at 10:18 pm
[…] tutorial has great tips and visuals. I hope you’ll click on over to check this tutorial out, as well as take time to check out Robin’s delightful blog […]
December 28th, 2014 at 8:49 am
Thanks for the step by step instructions. For the first time I know how!
February 1st, 2015 at 11:21 pm
The owner of the store where I bought my aurora 440 QE also removes the cover where the take up thread mechanism is and oils 3 locations there
February 5th, 2015 at 1:09 pm
The step and a picture to show each part and step was a wonderful to learn how to do this. I have always taken the machine to a dealer and had it done, but that is hours away. I thank you for giving me the confidence for doing it myself. Lint really does accumulate!
February 21st, 2015 at 6:14 am
that was the BEST photo ever of exactly what needs oiling. I looked all over the Internet for that. You rock!!!
February 22nd, 2015 at 11:03 am
I also have a 440QE along with numerous older Bernina mechanicals (which require a lot more oiling!). Wonderful instructions!! Thank you!
I was told to use Bernina oil for “computerized” machines for the 440QE. It is a lighter weight oil than the oil for mechanicals. If the oil has turned dark gold or brown, throw it out! Was also told that Bernina oil will not permanently stain your fabrics (in case some runs down the needlebar while you are sewing).
I try to oil every time I change out a bobbin, after eight hours of constant sewing, or every six months if the machine is not in use.
February 24th, 2015 at 4:56 am
My 440 is I for service as the icon popped up. I got a call that the front and bottom cover is loose and needs to be replaced very expensive, 100.00,plus my needle threaders, 50.00.does this happen often.
March 7th, 2015 at 1:41 pm
I keep my oil container in a small ziplock baggie. ALL the oil containers I’ve ever purchased have leaked creating a mess wherever it was stored. Now any leaks are inside the bag. Easy to take to quilting retreats.
I ALWAYS clean/oil at the beginning and end of a quilt retreat too.
June 17th, 2015 at 8:25 pm
I`ve followed these directions…. they`re great. Thank you! I have a little problem though…I`ve put the hook back in, and snapped the black hook race cover in place, and now when I try to sew, it beeps, and its a no-go. I`ve placed and replaced many times to no avail. Still beeps! Any suggestions?
June 23rd, 2015 at 7:33 pm
funny thing…if you put the presser foot down, machine works like a charm!
November 12th, 2016 at 6:23 pm
The tutorial is wonderful I have a 440 QE and love it..
June 20th, 2017 at 10:29 am
Thank you so much for these instructions. I clean and oil my 440 after every project. However, I had also been removing the upper part that came with a tool to unscrew it, and I oil every moving part, even around the feed dogs. Have I totally messed up, or is this ok? I will only do the bobbin case and cleaning the lint as you showed from now on, unless you tell me otherwise.
Also, one dealer said it was ok to use other oil besides just bernina oil. Is this true?
August 2nd, 2017 at 8:43 pm
Hi admin, i must say you have high quality posts here.
Your page should go viral. You need initial traffic only.
How to get it? Search for: Mertiso’s tips go viral
95Hilario´s last blog post ..95Hilario
August 27th, 2017 at 9:56 am
I have noticed you don’t monetize your page, don’t waste your traffic, you can earn additional bucks every month because you’ve got
high quality content. If you want to know how to
make extra bucks, search for: best adsense alternative Wrastain’s tools
86Karina´s last blog post ..86Karina
September 27th, 2017 at 2:41 pm
So, I’ve had my Bernina for over seven years. I have never oiled it. I was afraid! I just followed your simple instructions and I’ve never heard my machine be so quiet. It’s like it’s whispering to me…what took you so long? Thanks!
October 6th, 2017 at 3:10 pm
Fabulous info – the instruction manual AND CD just don’t have enough detail! I particularly like the idea of a drop of oil on the edge of the hook – so much easier than attempting to get a single drop into the race with the usual oil bottle spout.Thank you so much!!!!
January 5th, 2018 at 3:19 pm
I love these directions. My machine now sounds so much quieter.
My only problem is that little oil can keeps blinking. How can I get it to stop. It’s driving me nuts.
April 14th, 2019 at 5:53 pm
Remarkable! Its actually awesome piece of writing, I have got much clear idea regarding from
this paragraph.
Pearline´s last blog post ..Pearline
December 16th, 2019 at 1:34 pm
Thank you so much. I have an activa 240. Have never cleaned it. It has been shutting itself down. Wonder if this is the problem. Not much for lint to be found.