Buy PodPillows!


Categories
Archives
Bernina Aurora 440 QE: Free-motion Quilting – Part 2 of 2 – The BSR!

See Part 1 of this series here: Bernina Aurora 440 QE: Free-motion Quilting – Part 1 of 2: Free-motion quilting basics without the BSR.
So yeah, I know… it’s taken me forEVER to finally post about the one part of the Bernina 440 QE that is probably the biggest selling point for this machine; the feature that makes people go nuts, shell out the big bucks; the feature that is apparently life-changing, amazing, and worth your first-born child, if not your entire precious quarter collection. I personally have neither a first-born child nor a quarter collection, but given my limited experience so far with this glowing-red accessory, I might just be tempted. Yes, I’m talking (finally!) about the Bernina Stitch Regulator, or BSR for short.
Of course, you can surely do free-motion quilting without this fancy little device… For basics on free-motion quilting and to see how it’s done without the BSR, see part one of this two-part series. For those of you interested in learning specifically about the BSR, I’ve documented my exploration of this clever little piece of machinery. I’m no pro yet, but hopefully my experience can help you if you’re considering this machine, the BSR, or just learning more about free-motion quilting! Let’s get started to see how to make it all work.
What is it?
The BSR is an attachment to your Bernina sewing machine that will automatically regulate the distance between stitches while free-motion quilting. It attaches just like any other presser foot, but plugs into the back of the machine for power. It senses the motion of the fabric underneath to know when to trigger the needle to go. Not sure what free-motion quilting is? To get some basics on the technique, see part 1 of this series.
The BSR comes standard on the Aurora 440 QE and the Artista 730. You can use it on the Aurora 430, and Artista models 630, 640, 200 as well, but you have to pay extra for it. All Artista models support zig-zag with the BSR, but the Auroras don’t.
Woah… it costs HOW much?
Yes, well, let’s just get this out of the way now. This guy is expensive! The going price for the BSR appears to be about 900 bucks/quid/greenbacks/big ones/buckeroos (yes, that much!) when not purchased with a machine. Yikes! That’s 3600 quarters, for those of you thinking about parting with your stash. If you’re already starting to rationalize this purchase in your head, come talk to me. I’ve got a lot of great reasons I can give you to convince yourself/your significant other about why you will deduct such funds from your bank account/your 401-K/your first-born’s second-born’s college fund, I’m a pro at such things. Maybe seeing it in action here will be enough to convince you it’s worth it.
How do you use it?
Step one: Remove from adorable foam housing.
Behold the BSR in its natural habitat:
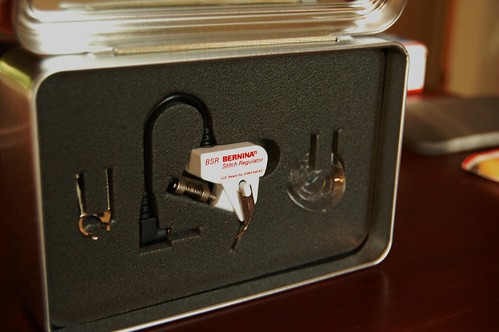
This box is really useful from keeping wire-biting cats away from this treasured item...
The BSR comes with three soles. On the left is the open-toed sole. Looks just like the darning foot, but offers an unobstructed view of the needle. On the right is the transparent plastic sole that is good for smooth sailing over thicker quilts (the disc actually compresses the batting surrounding the needle and allows for smoother stitching in tough, bulkier projects). The sole that is currently on the BSR is the closed-toe metal sole . It looks just like the darning foot’s sole, but instead is attached to an insanely expensive white box + wire combo. We’ll see the magic of it in a moment!
Step two: Lower the feed dogs.
Lower the feed dogs by pressing the feed dog button on the side of the machine, like so:

This button will put the feed dogs down. Down boys!
You need to do this to ensure free movement of the fabric while quilting. It will feel hugely weird if this is your first time free-motioning, but once you get past the slippery slidey feeling, it’ll become old hat. If you forget to put the feed dogs down, the BSR will beep at you and you won’t be able to sew, so don’t forget!
Step three: Attach BSR to machine
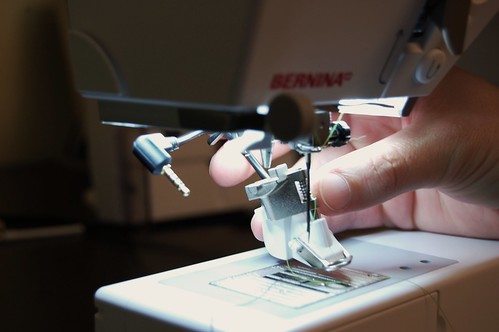
This process might make you feel like you have really big hands at first... You'll get it!
It’s just like a normal Bernina foot, but with a bit of extra stuff in the way. It’s a bit on the wonky side to get it on the first time (though not as difficult to put on as the walking foot!), but once you get it on there, it looks like this:
Finally on!
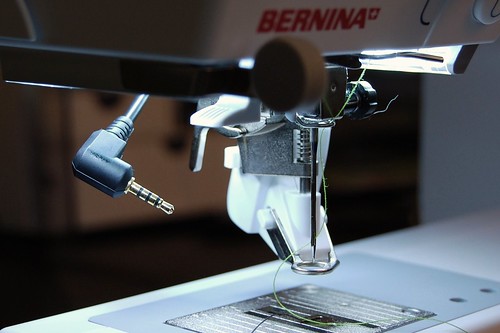
But what to do with that dangly cord? Ah, no worries! There’s a spot for everything! Here is the underside of the machine, where the socket lives. For some perspective, at the bottom-left is the BSR’s body.
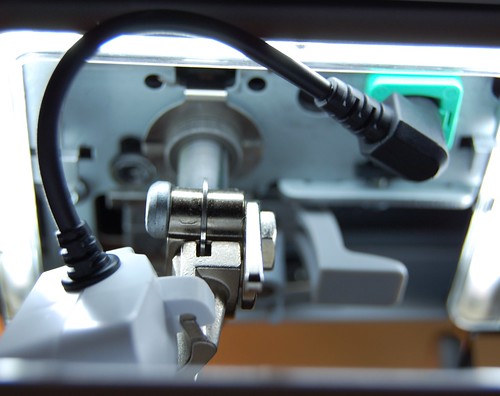
It's even got a green box around where the cord should be inserted. Bernina took no shortcuts in producing this machine!
Once you plug this bad boy in, you’ll see your display change. It will start blinking BSR in the middle, just below the needle up/down indicator:
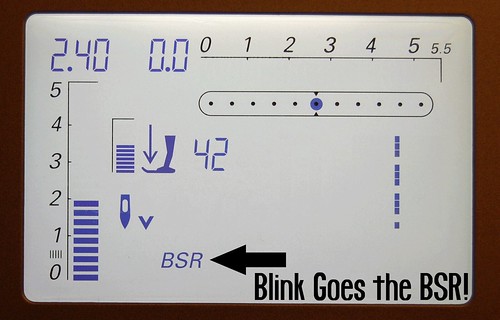
Imagine this blinking...
Step 4: Press the BSR button.
Then you need to actually press the BSR button, with the little scales beneath it to get the BSR 1 to appear:
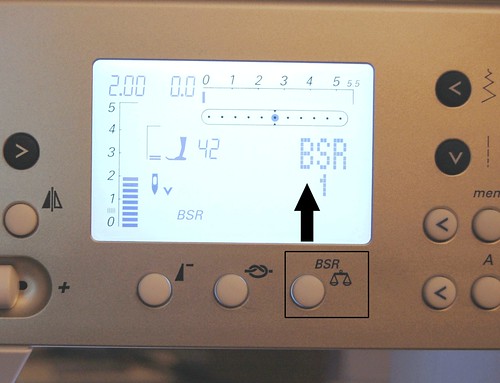
Pressing the BSR/scales button will automatically put the machine in BSR mode 1 as long as the BSR is plugged in.
The scales have nothing to do with the BSR. If you press this button when the BSR is not plugged in, it is supposed to provide stitch balancing – a feature even the woman that sold me this machine was not able to explain clearly or convince me that it did anything useful. That button, however, is your ticket into the world of BSR when this guy is plugged in. Once you press it, the BSR1 text comes up on the machine. This means you’ve entered into the exciting land of Mode 1. Now you can start BSRing!
Wait a Sec -What’s This About Modes? How Complex Is This Thing?
Mode 1: This mode lets you use the foot pedal to stitch. Also, if you leave the fabric in place but keep pressing the foot pedal, it will continue stitching. If you want to be able to stitch in place, you should use this mode.
Mode 2: This mode lets you sew feet-free! That is, without the feet attached to your legs, not the feet attached to the BSR. Stitching is triggered by the movement of the fabric. It’s pretty swanky! First, let’s finish exploring Mode 1, which I’ll call “traditional” mode, since most of us are used to sewing with both hands AND feet involved.
Start Quilting
OK, now you’re ready to start quilting! Take your fabric sandwich, place it under the foot, and press down on the foot pedal. You should see the red glowing light turn on while stitching, like so:
I love the gentle red glow!
Troubleshooting tip: If the red light isn’t on, the BSR is not active! Double-check to see that the BSR 1 is displaying on the machine, that the feed dogs are down, and that the device is properly plugged in to the back underside of the machine. If not, go back to step 1.
Now, if you’re playing along at home, you can see that if you press the foot pedal a certain amount and leave the fabric in place, the BSR will just slowly stitch in place. The fun starts, though, when you start moving the fabric around. Leaving the foot pedal speed the same, try moving the fabric around at different speeds. The needle speed will change based on the speed that the fabric underneath moves. I imagine the red glowing light has something to do with this. Either way, it’s a lot of fun!
Let’s move on to setting up mode 2 before we dive into results! If you are feeling impatient, you can jump down to the results section to see the difference between BSR and regular FMQ.
Setting up Mode Two
For those of you interested in using the fewest appendages possible while BSRing, this is the mode for you! Mode 2 is also quite useful if you have a large project (like a quilt) and you think you will be starting and stopping often. BSR mode 2 will not stitch in place when the fabric stops. Instead, it will just stop sewing. To get feet-free BSRing to work, here’s what you do:
Step 1: Unplug foot pedal

I feel like one of Barker's Beauties demoing a product on The Price Is Right. Ah, loved that show. "By guessing the price of these every day grocery store items, you can win this beautiful Bernina sewing machine and... A NEW CAR!" Anyway...
As I was trying for the first couple of times to get into Mode 2, I could never get it to work! Finally, I realized that I was forgetting to unplug the foot pedal. Apparently the 440 needs to make sure you’re committed to foot-free FMQ. Otherwise you’re not allowed to play!
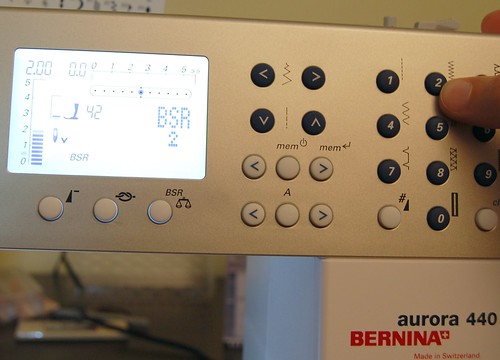
Step 2: Press the BSR button, and then the “2” button to enter into BSR Mode 2
"Rod, tell the contestants what they're bidding on today." "Bob, it's a beautiful new baker's rack!"
Once you press the BSR button, then the 2 button, the BSR 2 indicator will appear on the screen.
Step 3: Press the stop/start button

"Rod, tell Gina what she's won." "Bob, she's won a BRAND NEW BEDROOM SET!" Ok, ok, enough with the Price is Right. I just can't stop strolling down memory lane!
Pressing the stop/start button will tell the machine that you are ready to go! The minute you start moving the fabric, the BSR will take off.
Step 4: Behold the Running Guy
Running guy? YES! Aside from the amazing stitch quality, the running guy is my favorite part. Behold!

Running Guy! Go BSR, Go!
When the feet-free BSR mode is in progress (i.e., your stitching has begun!) the little running man appears on the screen. Someday we will all look at this little pixelated graphic and declare it “vintage” and “retro” and “full of awesomeness.” It already feels that way, but I have no doubt it will look even more old skool in several years.
So now what you’ve all been wondering. Does the BSR really make a difference? Here’s a picture of free-motion quilting without the BSR. Below that is a picture with the BSR so you can compare for yourself:
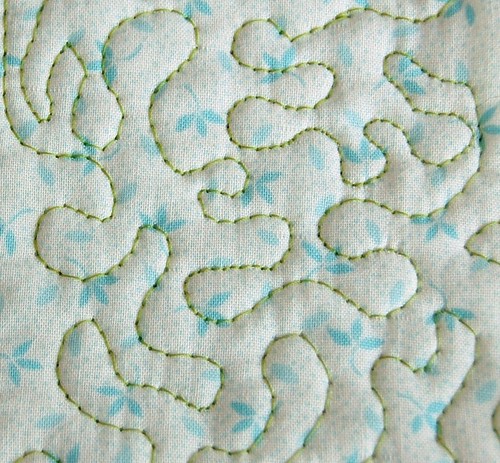
Free-motion quilting without the BSR. See the long stitches at the bottom and the tigher stitches in the middle and top? It looks quite inconsistent. It looks especially messy from far away.
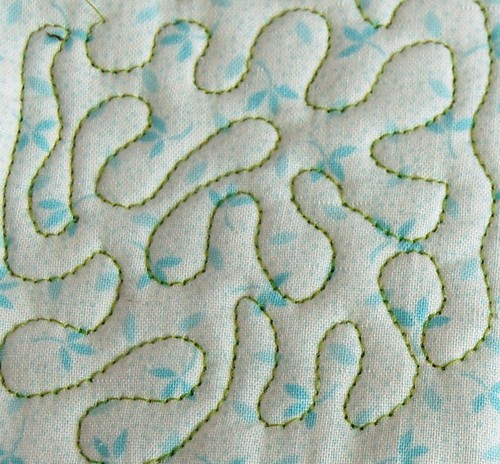
Free-motion quilting with the BSR in traditional Mode 1. Muuuuch smoother, no? Look at how equally spaced the stitches are! It really works!
Wow! For my very first attempt, it looks pretty good, all thanks to the BSR! Notice how the stitches are equidistantly spaced and look clean. I love the puffy little pillows it makes between each area of stitching. Compared to my plain old darning foot stitches, I think it’s a big improvement. It feels as if there is much more control when using the BSR, but I can’t decide if that’s my rationalization superpowers talking. Here is a picture of my random squiggles in all different modes so you can compare No BSR, BSR mode 1 and BSR mode 2:
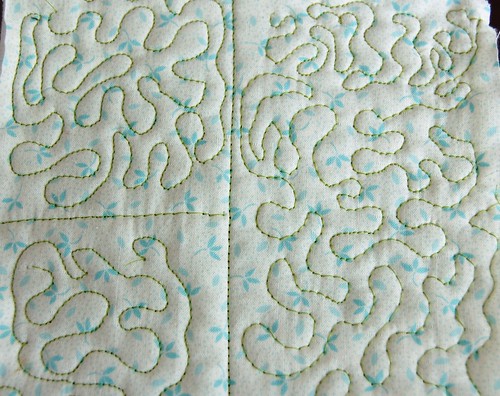
Top left: BSR 1; Bottom left: BSR 2; Right side: No BSR
And a closeup so you can see the stitches:
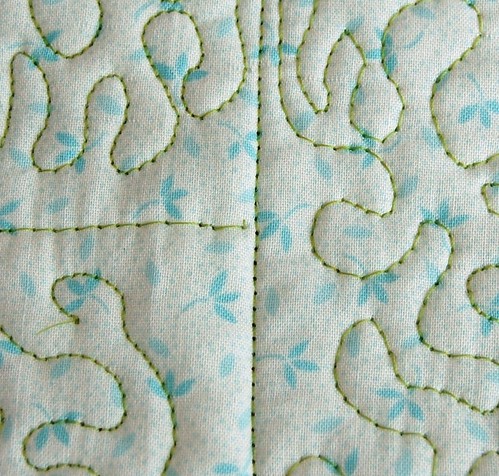
Top left: BSR 1; Bottom left: BSR 2; Right side: No BSR
I think this difference is hugely noticeable. Free-motion quilting with the BSR makes a much neater, more professional-looking finished product.
What’s the verdict? Should I get one?
Ahh, well, that’s for you to decide, isn’t it? My first foray into using it was fun and really produced noticeable results. I am happy I got it with my machine and I have no doubt that it will help me get the right finished look for quilts going forward. My crafty roots do not lie in quilting at all, never mind the free-motion variety, but I can tell you that if you’re not much of a free-motion quilter yet, being the proud owner of this shiny little number will make you want to be! The BSR was a major reason I decided on the 440 instead of the 430, and I plan to use this thing a ton!
So there you have it! Hope you enjoyed this post if you made it this far.
Please feel free to post any links to finished products you’ve made using the BSR! I’d love to see what else this baby can do!
Posted by robyn on August 15th, 2008 under bernina 440 qe, crafts, sewing, sewing machines, tutorials144 Responses to “Bernina Aurora 440 QE: Free-motion Quilting – Part 2 of 2 – The BSR!”
Leave a Comment
Handmade High Tech

I'm Robyn. Thanks for stopping by! This is my craft blog.
Contact me at robyn [at] dognamedbanjo [dot] com.
January 11th, 2012 at 6:04 pm
Usually I don’t read post on blogs, but I wish to say that this write-up very forced me to try and do it! Your writing style has been amazed me. Thanks, quite nice post.
February 15th, 2012 at 9:26 pm
My BSR just quit on me! I have been using it successfully for a year now and tonight it would not connect, would just quit completely or sew wildly. Have any of you had this problem?
I am frustrated tonight.
February 29th, 2012 at 9:54 pm
The lower plastic area of my BSR….which holds the metal section….has cracked! On dealer’s tech guy says he’s had 8 memos from Bernina about this, but my dealer at home hasn’t heard anything. The first dealer…in my winter location….told me if I paid $150.00 they would mail mine in and get me a new one!!!! What’ going on? The original purchase price should provide and attachment that holds up!
March 6th, 2012 at 8:41 pm
Hi Dori, So sorry to hear about your BSR going crazy! I haven’t heard of this behavior. You might check in with the folks over at the Bernina 440QE mailing list. There’s at least one tech there that knows a bunch about issues that occur. Could it be the sensor needs cleaning or got dusty? I hope it works itself out soon! -Robyn
March 6th, 2012 at 8:43 pm
Hi Ella,
How sad that the plastic part of the BSR broke on you! I agree – the purchase price is enough to also provide a warranty on faulty parts. How long have you had it for? Can you negotiate with the dealer? Good luck, and I’d love to hear how this gets resolved. -Robyn
March 16th, 2012 at 8:10 am
Superb tutorial! Thanks so much!
April 6th, 2012 at 5:48 am
I just pick up the 440QE, the display model as Bernina will no longer be making. I’ve been trying to follow the book for the BSR for an hour w/ no luck, but thanks to your tutorial I have success. Thanks so much it’s is really helpful for us newbies to free motion and bsr’s!
May 3rd, 2012 at 1:30 pm
Hi there! Huge Thank you for this excellent tutorial!!! I cannot express enough how helpful your post has become for me!
I have had my Bernina 440QE for a year now and even though I specifically bought it for the BSR (was going to start free-motion quilting and someone recommended Bernina – thanks to them!!!), I have never used it!!! Purely because the Bernina manual is so poorly describes how this works – I did not have fun when trying a year ago and just gave up.
Really really excited tonight! Decided to google BSR function for no obvious reason and here we go – have found your superb tutorial. You have provided very helpful info about thread balancing, puffyness due to a good balance and pulling the cable for foot pedal out… Again, Thank you very much! Now I will stay on your blog and read more 🙂
May 24th, 2012 at 6:14 am
This is fabulous. How did I never find this post before?! I have a Bernina 200E that is upgraded to be like the 730E with the BSR upgrade as well. I didn’t have time to play with the BSR when I first bought it, and when I finally got around to using it I read in the directions about controlling it with the start/stop button and it was a disaster, like robot aliens invaded my sewing machine and it wouldn’t cooperate at all. Come to find out that the 200 and 730 machines DO NOT HAVE a start/stop button — I was hitting the quick reverse button and it wasn’t doing anything at all!
I’m trying to learn free motion quilting now and I’m experimenting with Foot #24 (old school) versus the BSR Foot. I know BSR gives better stitch length right out of the gate, but I just feel so much more in control of what I’m doing when I’m NOT using BSR. Also I get better visibility when I have to quilt away from myself diagonally to the right without BSR, because the top bulky part of the BSR foot obstructs my view of where I’m going. I’d like to learn to do it both ways.
I see you wrote this post a couple of years ago. Have you been doing more quilting since you got the BSR machine?
Rebecca Grace´s last blog post ..Quilting Inspiration From End of Grade Exam Proctoring
June 2nd, 2012 at 9:50 pm
You neglected to change the presserfoot tension, change it to 0 zero, his is described in the instructions, it helps the bar work even better!
June 11th, 2012 at 10:02 am
Onde comprar esta maquina bernina 440 em nova york e Orlando, por favor me mandem endereços, viajo em agosto/2012. Gira em torno de que preço.obrigada
June 18th, 2012 at 6:40 pm
Thank you so much Robyn! I have had my 440QE machine a few years and attempted to use the BSR without success. Your tutorial is just simple excellent. Will be experimenting all day.
September 5th, 2012 at 6:17 pm
Robyn, I can’t tell you how much I have learned in just a few lines of your tutorial. I have had my 440QE for a number of years. I have done some small pieces on it but everytime I sit down with the BSR, I struggle. This tutorial is great, I can hardly wait to sit down and read it all through again when life isn’t getting in the way. So Thank you!
December 7th, 2012 at 9:36 am
Thank you for this helpful site. Informative and cleverly written. I felt as if you were sitting near me and my machine (and laptop)giving me gentle guidance.
December 10th, 2012 at 3:34 pm
Great tutorial. I love my BSR foot but having a few issues like long thread jumping to the next stitch and the thread coming out every 30 seconds. Will be taking it to my dealer tomorrow. You have such lovely stitches. I can hardly wait ti practice.
December 27th, 2012 at 10:56 pm
The tip of the plug on my BSR wore down after using it for about 8 years. Is is possible just to have the tip replaced rather that purchasing another BSR? Anyone experience this same problem?
February 7th, 2013 at 9:33 am
Very good information. Lucky me I discovered your blog by chance (stumbleupon). I’ve book-marked it for later!
February 16th, 2013 at 4:39 am
there is a lady on the yahoo group ‘sew its for sale’ that has a new one for 400.00
May 1st, 2013 at 2:59 pm
I already did free-motion when I got the Bernina (After drooling for the BSR for years). What a disappointment!. I gave it 18 months for learning. I learned to slow down to a snail’s pace so it could “regulate” properly. I learned to turn the fabric so it could handle sewing near the edge where it’s “eye” couldn’t see the fabric. Though acceptable for utility & baby quilts, it was not show-quality stitching. I went to the shop to investigate and they said “this is as good as you’re going to get without going to a long-arm. I removed the BSR and went back to regular free-motion. Similar quality and a lot faster. Now if I slow down, my stitches are show quality.
Glad you like yours. Didn’t work for my needs. Thank you for helping folks with your tutorial
May 27th, 2013 at 12:12 pm
Hi Robyn
I am just about to do button holes and had trouble a year ago so haven’t bothered since. Have also been trying to do free motion quilting with a fleece backing without success.
I will not have another go at both thanks to your blog.
May 27th, 2013 at 12:12 pm
Sorry meant now another go not Not. Sorry
June 25th, 2013 at 1:16 pm
I agree with Barbara. I have a 730E – oh dear – one problem after another. My dealer keeps on telling me that it is my fault that the BSR doesn’t work. I keep practising and making samples, but I have no confidence in the BSR to do any stitching on items which I am going to give to friends. I get better results with the regular embroidery foot.
July 24th, 2013 at 1:27 pm
That’s a beautiful machine, I wish I could afford one right now. The only Bernina I’ve owned is a little HobbyLocker. Thanks for the write up.
August 17th, 2013 at 4:20 am
Your tutorial is a great one. I am looking for advice for when the stitch skips and ends up being one giant stitch. It seems that the bottom thread does not get picked up for several stitches, creating a very long stitch. I’ve been using my BSR for a few years without this ever happening and now I can’t finish a project because I’m spending my time taking the giant stitch apart and redoing.
March 12th, 2014 at 4:06 pm
Your instructions are better than the Bernina book.
Thank you
July 15th, 2014 at 3:57 pm
Have been quilting with a bsr for about 8 years. Love it. It’s not perfect but it has allowed me to focus on my quilting designs not keeping my stitch length even. I am so much better at quilting and I finish all my tops into quilts now.
September 15th, 2014 at 12:22 pm
You saved me today went I went to use my BSR. I couldn’t figure out why it was not working in Mode 2. I looked on your blog and I had not pressed the stop start button. thanks again.
January 23rd, 2015 at 5:04 am
Ahaa, its nice diaalogue abouit this post at tthis placce at
this blog, I have read all that, soo at this time me also
commenting at this place.
Birthday Games´s last blog post ..Birthday Games
January 27th, 2015 at 12:11 pm
Brilliantly done and very helpful! Checked it out in anticipation of the arrival of one Bernina Aurora 440QE which I’m taking possesion of in a few weeks!
Wahaay!
I’ll be keeping this post handy for reference.
Thank you!
January 28th, 2015 at 11:12 am
Hi there all, here every one is sharing such experience, therefore it’s pleasant
to read this web site, and I used tto visit this weblo all the time.
my webpage best christmas
best christmas´s last blog post ..best christmas
February 1st, 2015 at 10:08 pm
This is the perfect blog for everyone who wishes to find out about this topic.
You understand so much its almost hard to argue with you (not that I really will need to…HaHa).
You certainly put a fresh spin on a subject that’s been written about for
many years. Excellent stuff, just wonderful!
sexually transmitted infection´s last blog post ..sexually transmitted infection
February 27th, 2015 at 5:22 am
Thanks for BSR information. The manual is not all it could be! I may even have a go at button holes again!
March 18th, 2015 at 8:06 pm
[…] a small project that uses the amazing Bernina Stitch Regulator (BSR). It’s a tiny protoquilt: something a little bigger than a coaster, much, much smaller […]
May 3rd, 2015 at 12:23 pm
This allows your body the time it needs to repair and rebuild themselves
with a bit of rest. To begin, stand on the Wii Fit board and raise one leg in front of you.
There are internet sites that permit you contrast rates or prices from a number
of on the internet stores.
dmz supplement directions´s last blog post ..dmz supplement directions
May 14th, 2015 at 3:44 pm
Excellent goods from you, man. I have remember your stuff
previous to andd you’re just too great. I actfually like what you have received
here, really like what you’re saying and the wway in which you say it.
You are making it entertaining and you continie to take care of to keep it smart.
I can’t wait to learn far more from you. This is really a terrific web site.
my blig … marc gafni spiritualist
marc gafni spiritualist´s last blog post ..marc gafni spiritualist
June 5th, 2015 at 7:34 pm
I recently purchased an Aurora 450 with a BSR and have been trying to find info on how to use the BSR for zigzag quilting. The 440 and 450 are similar machines, except for the 450 having a wider sole plate. I thought , maybe, if the 440 BSR can do zigzag quilting, you can help me. Thanks.
July 18th, 2015 at 4:45 pm
Thanks for the informative blog! I’ve had my 440 for several years now and finally decided it’s time to quilt some of my own works. But when I attached the BSR I found that the dìrections in the manual aren’t the best, and neither is my memory from that long ago class for new Bernina owners! So, with your help, I’ve started a bit of practice quilting and it doesn’t look too bad! Soon I’ll be quilting some of my own works! Thanks so much for the help!
July 27th, 2015 at 2:50 pm
This blog has the best information on BSR I have found.
On my Bernina 440QE using BSR mode 2 the needle does not stop when I quit moving the material. The needle just keeps moving up and down until I turn it off.
Do you know what I can do?
July 31st, 2015 at 11:13 am
I use my BSR all the time….although I took my machine in to get cleaned and now I can’t get it back working. I press the BSR button and all that comes on is the balance icon. what am I doing wrong. I only use this machine for quilting and I can’t get it back going again. Can you tell me what I am forgetting to do?
August 18th, 2015 at 9:31 am
I have an Aurora 430 with a recently added BSR. I’ve experimented with both modes, and my stitches aren’t even. The running guy appears in the display and the red light is on when I stitch. Any suggestions?
March 31st, 2016 at 9:23 pm
Thank You for this post!!! Even though this 430/440 Aurora machine is outdated for Bernina. I’m still enjoying mine and just purchased a BSR. Your post was extremely helpful. Loved all your descriptions!!!
May 28th, 2017 at 1:38 pm
I have a question, I am looking into ruler quilting on the 440 QE, but if I buy the adjustable foot, I have to forgo the BSR, correct?
July 29th, 2017 at 3:06 pm
I have a Bernina 560 and bought the BSR as an extra add on later. I have tried everything and it worked 1 time and since then, when I set it up and plug it in, the machine never goes into BSR mode and does not change at all….I have tried removing pressure foot and using stop/start, nothing works…HELP!
January 10th, 2018 at 12:30 pm
I have noticed you don’t monetize your page, don’t waste
your traffic, you can earn additional bucks every month because you’ve got high
quality content. If you want to know how to make extra money, search for: Mertiso’s tips best adsense alternative
LastRoman´s last blog post ..LastRoman