Buy PodPillows!
Categories
Archives
Tutorial: iPod Touch Cover!
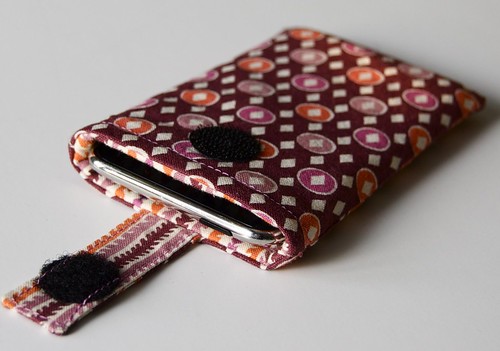
Hello my music-listening, smart-device-toting sewing friends! Some of you may recall my little green iPod cover (that, incidentally, never got its own blog post, but has made some special (or stealthy) guest appearances in some posts about other bags (like here and here!)). Not only have you observant readers spotted it in a few places, but a several of you have asked for a tutorial. So, let’s call this my overdue New Year’s gift to you! I hope you find it useful and fun to make. You will have your iPod tucked into a cute, padded, and protective cover in just about 1-2 hours or so with this little photo-full instructional guide.
If you’re looking for a killer accessory duo for your iPod or other smart device, check out my PodPillows on Etsy!
If you make a cover from my tutorial, please consider uploading some photos to the Dog Named Banjo Tutorials group pool on Flickr.
– one 10″ x 3 3/8″ piece of quilting-weight fabric for the outside.
– one 10″ x 3 3/8″ piece of quilting-weight fabric for the lining.
– one 9 1/2″ x 3 1/8″ piece of thin fusible fleece.
– one 1 1/4″ x 2 3/4″ piece of exterior fabric.
– one 1 1/4″ x 2 3/4″ piece of lining fabric.
– one set of Velcro dots (if you don’t have the round dots, you could also cut small squares for this – no biggie!)
– some double-sided sewing tape. This is optional but a useful tool!
– an iPod Touch! (also optional, especially if you’re planning to give this as a gift!)
- You may notice that I’m using Denyse Schmidt’s Hope Valley fabric. Yum! Also, it’s perfect for this, because it’s non-directional. This tutorial works best with fabrics whose patterns don’t have a top and bottom. Know what I mean?
- Also, all seams are 1/4″ unless otherwise specified (like in that one spot later on in which I specify a 1/2″ seam).
- Just to be clear, I created this tutorial based around my 8GB iPod Touch that I got a bit over a year ago. the newer iPods may have slightly different (thinner) dimensions.
Now that you know what you need, let’s get this show on the road.

Here's what it will all look like when it's cut out. The fusible fleece is at the bottom, and is totally in camo mode, trying to hide from the camera against the white background!
That wasn’t so bad, was it? You can now rest your cutting muscles, but warm up your ironing muscles. Ok, next up – fusible fleece.
The fleece is sized to be slightly smaller than your lining fabric. You’ll want to center the fusible side of the fleece on the wrong side of the lining fabric, so it’s not actually touching any of the edges. This means that your seams won’t be quite as bulky when you finally sew everything together. Clever, no?

The two sides of the fusible fleece are pretty distinctive. You'll want to place the non-fuzzy side of the fusible fleece down on the wrong side of your lining piece. The fleecy part should be facing up! Don't forget to line up the fleece so that it's centered on the lining piece! None of the edges should be flush with the fleece.
Once it’s centered, flip the lining + fleece over so that the right side of the lining is facing up. Haul out the iron from the closet and warm up that bad boy to the wool/steam setting.
Stretch… crack your knuckles. One, two, three… Fuse!

No need for a press cloth or for anything fancy. Just go over the entire piece a few times with your normal ironing motion! It should fuse the fleece enough for the purposes of this project.
3. Fold lining in half and sew the long sides of lining together
Fold the lining in half widthwise, right sides together, so the two short ends are together. The fuzzy part of your fleece should be facing out, like so:
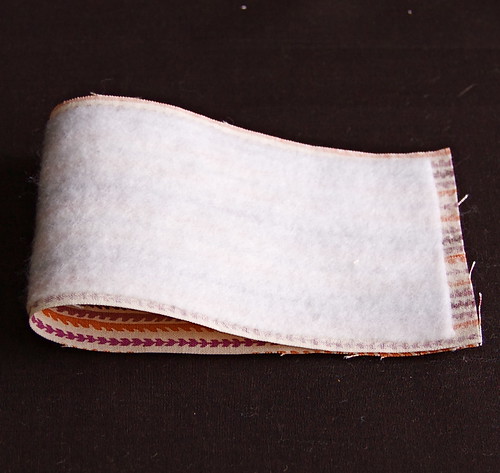
Fuzzy side out, right sides together!
Pin the sides together, and sew both long sides of the lining. Do not sew the top or bottom – just the two long sides!

Hey look! The Bernina has snuck its way into another tutorial, and this one's not even about it. Not to fear... She'll get another of her own tutorials soon!
4. Attach velcro to outer fabric
First, fold your outer fabric in half lengthwise (long edges together) and finger-press so that you can see a slight crease, as in the picture below. This will help you to get the pesky Velcro centered on the fabric when the time comes to sew it on.
Grab one part of your Velcro pair. I like to put the firm (not the fuzzy) part on the main body of the iPod cover, so reach for that one.
Now, reach for your double-sided tape, if you have some. (If you don’t reach for some pins.)
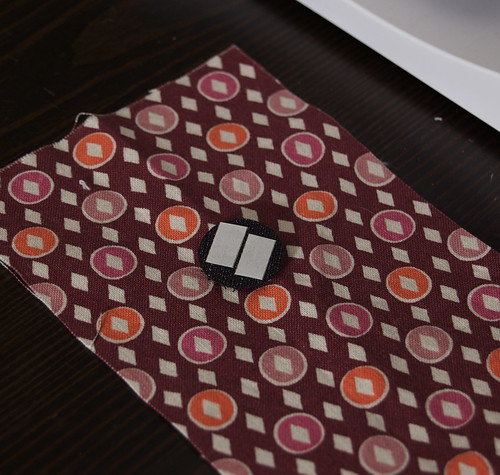
If you have it, attach a little double-sided tape to your Velcro. It's a piece of cake to sew on when it stays in one spot! Above, two pieces of double-sided tape with the backing still on.
Stick or pin the Velcro so that the top of the dot is 1″ below the top of the fabric. Now sew!
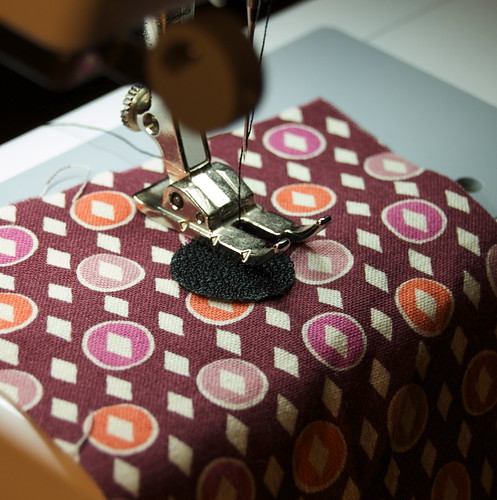
You can sew the Velcro on in a circle, or you can do a few straight lines to keep it in place. Up to you!
5. Fold the exterior in half and sew the long edges of together
Fold the outside in the same way that you folded the lining – widthwise, right sides together so the short sides are lined up together. Now sew a seam down each of the long sides. Once again, don’t sew the top or bottom edges together.
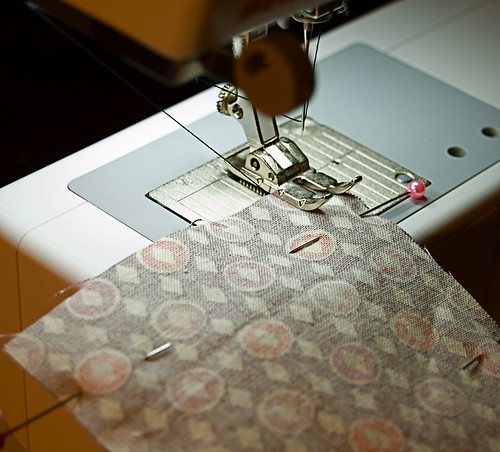
I just opened a new box of pins, and I'm adoring the little pink pearlescent ones. There's nothing better than a new box of fresh, straight pins! If it weren't for the publicness of the Internet, I'd probably still be using my old, horrifyingly bent pins that have definitely seen better days. Thank you, Internet!
Now let’s see what we’ve got. You should have two pieces that look like this:

Congratulations! You now have a completed exterior piece and lining piece!
5a. Trim the edges of each of the pieces
Is it unfair to have a 5a? Probably, but hey, they say not much in life is fair, right? Plus, this tough love attitude will get you a great finished product! Really!
Anyway, you really ought to trim about 1/8″ away from the side seams of both the lining and the outer pieces. Once you’re done hop over to number 6!
6. Attach fuzzy Velcro piece to the lining of the flap
Once more, reach for your pins or your double-sided tape. Center the Velcro, fuzzy side up, about 3/4″ from the bottom of your lining piece for the flap. Here’s a picture of the under-side of the Velcro dot with the double-sided tape, getting ready to be stuck to the fabric:

Flip the Velcro over, and it'll stick nicely to the lining, all ready for sewing. This picture shows the sticky part of the double-sided tape, all ready to adhere.
Now sew the Velcro dot to the lining fabric! Can’t you just see this all coming together? Your iPod Touch will soon have this adorable flap to hold it snugly in place.
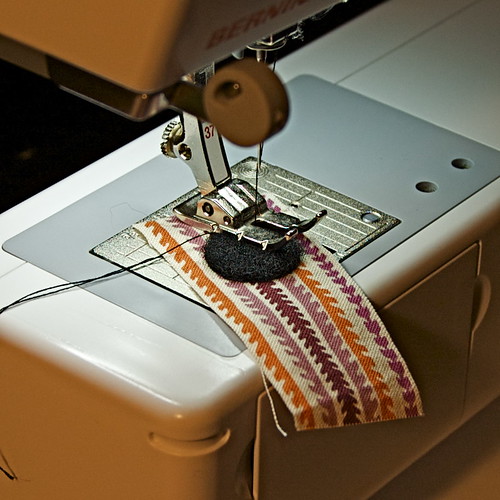
Just like the other Velcro piece, it doesn't matter if this is sewn in a circle or in lines. Either way, just make sure it's secure! This sucker will get a lot of use if you're like me and taking it in and out of its pouch all day long!
Now take the exterior flap piece and the interior piece you just sewed Velcro onto, and place them right sides together. Sew three sides together – the two long sides, plus the short side closest to the velcro you just sewed on. Leave the remaining short side open, like below.
Trim the three sewn sides, and make diagonal cuts at the bottom corners. This is to reduce bulk when you turn this sucker inside out. Take care not to cut your seams!

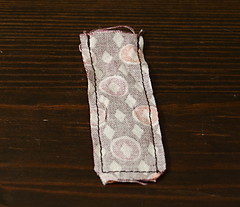
Now turn the flap inside out. Beware! This flap is small. You should invoke the help of something pointy (but not sharp) to help you turn it inside out. This is by far the most challenging part of the tutorial! I rely on my stash of trusty cheap Bic mechanical pencils.
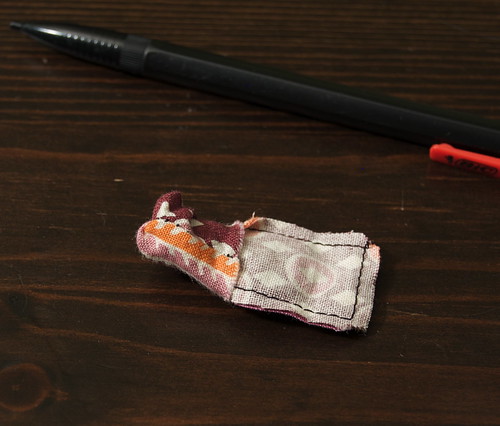
Sidenote: I love these Bic pencils and have massive quantities of them, lest they go out of business some day. I will always buy the 50 packs when I find them in stores (which is less frequently that I used to). See? Perhaps I'm right to be paranoid! I'm not sure why I love them so much, but I do.
All done turning? (Did you invoke your favorite mechanical pencil?)
Now give it a quick iron, and topstitch the three sewn sides, leaving the opening… well… open.
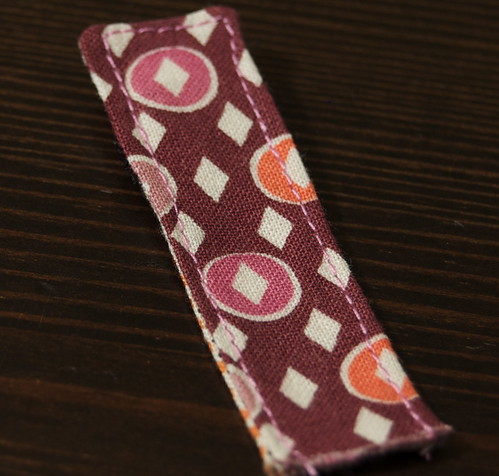
It should look about like this when you're done!
Yay! You’re done with the flap!
You’re almost done! Take a sec and lay out what you’ve done. If you turn your lining right side out, the pieces you have in front of you should look something like this:

A clever little trio of pieces!
Ready to move on to the last steps? All that’s left is the final assembly.
10. Place the lining bag inside the exterior bag
First, make sure the lining is right-side out.
Next, make sure the exterior piece is right-side in.
Third, insert lining into the exterior, like so:
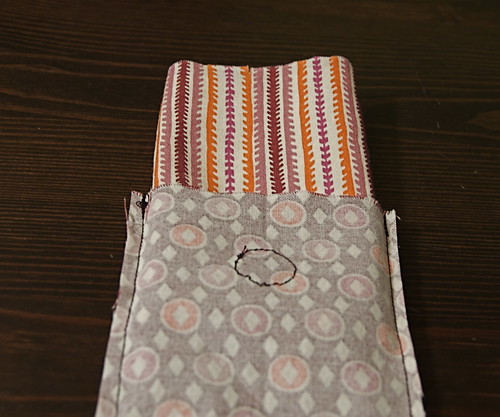
Think of these as individual little bags. Insert the lining bag into the exterior bag. Put it in all they way so the edges are flush!
Once you’re done, the top edges of the lining pouch and the exterior pouch should be flush. Line up the exterior seam with the lining seam on each side. It’s these little finishing touches that make all the difference!
Now, mark the center of the back of the pouch:

A handy trick is to just fold the entire thing in half lengthwise (long edges together) and mark the center fold.
11. Place the flap between the lining and the exterior
This one gets its own step because it’s kind of tricky to explain. Thankfully, I have visual aids! (This is the part where, in real life, I might whip out a Powerpoint slide presentation, plus some props, to demonstrate the technique. Alas, this isn’t that kind of real life, I guess! Today we’ll use annotated images instead!)
Insert the flap between the back of the exterior pouch and the lining pouch, making a flap sandwich. Make sure that you don’t place the flap on the same side as the Velcro that you put on the body of the exterior pouch!

Hopefully you can tell where the flap gets inserted. Make sure the fuzzy Velcro and the lining side of the flap is facing the lining and the exterior of the flap is up against the exterior pouch. Just think - exterior to exterior, interior to interior!
Push the flap down all the way so that the opening is flush with the edges of the lining and the exterior. Now pin it all together, leaving a ~3 – 4″ opening at the front of the pouch!

I'm leaving most of the front open. The opening will be there so that we can turn the cover inside out - the fun part! See where the three pins are closer together? That's where my flap is pinned. Juuust a little extra TLC there to make sure it's not moved out of place and actually ends up straight in the end.
Sew using a 1/2″ seam from one pinned end to the other. This is kind of tricky! In the picture below, you’ll see that, since the pouch is so small, there’s no way to get this around the free arm. Instead, you have to sew from the inside, and hold the rest of the pouch off to the side so that you don’t sew the entire pouch together by accident!

You'll want to sew from the inside bottom for this task. It's easier. Just take care to hold the rest of the pouch out of the way so you don't sew it all together! (I've done this. It isn't recommended!)
13. Done? Now turn the pouch inside out!
This is the fun part! It’s like watching a butterfly emerge from its cocoon after eating one apple, two pears, three plums, four strawberries…
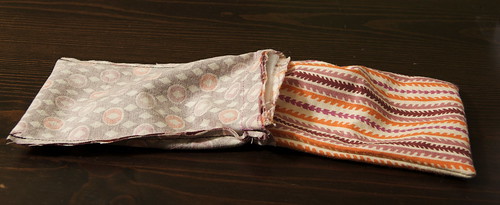
Stage 1: shy butterfly shows its lining.

Stage 2: shy butterfly shows its exterior
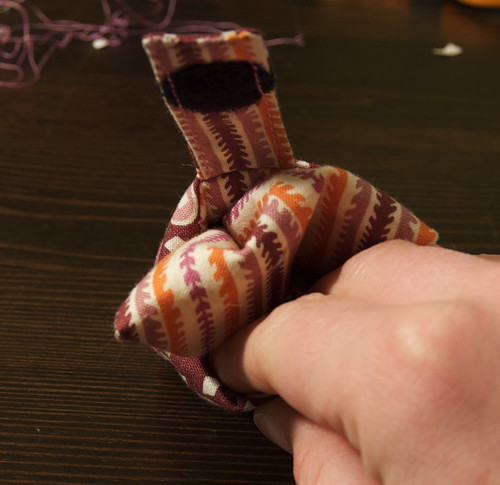
Stage 3: Shy butterfly gets help from the friendly stick animal to get his lining where it belongs. (What? Change sometimes happens with outside forces involved, right?)
Sanity check: Now that the cover is turned right side out and is almost done, does the iPod touch fit?
Because we’re skeptical by nature, let’s make double sure.

Yup! (Of course it does! You don't think we'd get this far and it wouldn't fit, do you?)
Yup! Fits. Moving on. Time to stitch up that hole and apply our finishing touches!
15. Pin and topstitch.
The back and sides of the top of your iPod Touch cover should be stitched nicely together but you might recall that we left a big opening in the front to allow the butterfly to experience metamorphosis.
Pin that hole shut, making sure that the exterior and lining pieces of fabric at the opening are roughly folded in at about 1/2″ to make a straight line at the front of the pouch. The fabric will naturally want to fold at this spot, since the rest of the pouch has a seam there.
Once you’re pinned, we topstitch! Living on the wild side, we’re topstitching from the inside. Unconventional, yes, but really? The only way this will work…
I topstitch 1/4″ from the top of the pouch. I like to start at the back so that the reinforced (read: slightly unsightly) part of the stitch isn’t right in front.
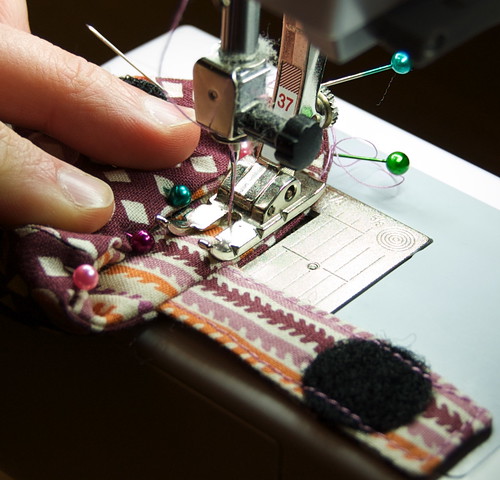
Take good care to keep the side of the pouch closest to you out of the line of the needle, or you'll be ripping out a seam that sewed the top of your pouch shut!
16. Insert iPod Touch and enjoy!
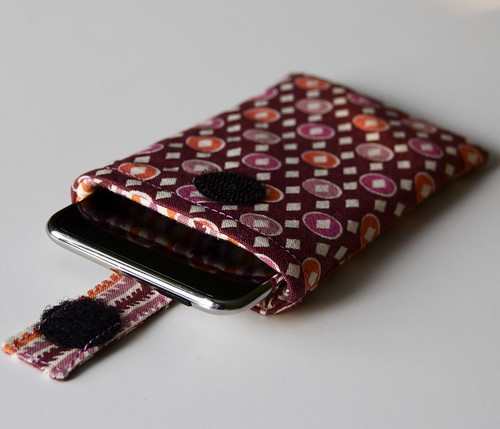
Phew, that wasn't so bad, was it? Sometimes these tutorials make things look so hard when they're not really so hard! Hope you got through it and have a lovely iPod touch cover to show for it!
I’d love to see pictures of things you make from this tutorial! Please post pictures of your iPod Touch cover in the Dog Named Banjo Tutorials group on Flickr! I’d love to see what you made!
You can find more pictures of the cover-making process not shown here in my Flickr set dedicated to this tutorial.
If you’re among the ranks of the iPod carrying, I’d love for you to share your favorite app with me in the comments of this post! Mine is VegOut – it’ll list all of the closest vegetarian restaurants based on where you are at that moment. What did we ever do before these things?
P.S., if you’re looking to fully outfit your iPod, or if you’re looking for great holiday gifts for your iPod-loving friends, check out my PodPillows on sale at Etsy! They’re great for music and phone devices of all types!
Copyright Dog Named Banjo, 2010. This pattern is strictly for personal use only. You may not sell items made from this tutorial. Thanks!
Posted by robyn on January 13th, 2010 under crafts, sewing, tutorials




January 15th, 2010 at 12:34 pm
Hi Robyn,
really nice tutorial – I might have a go tomorrow as a welcome-project for my brand new sewing machine.
Found your blog while searching for info on the Bernina Auroras – mine is the 430, so not quite as whizzy as yours, but more exciting than I can express! I look forward to seeing more of your tutorials.
Jenny
ps. I like your blog title: I have a dog named Bongo 😉
January 15th, 2010 at 12:52 pm
There you go again, Robyn! I was just thinking the other day that I need to make a pouch for my iPod now that my son is always toting it around. Only I think I want a pocket for my headphones to stay with it, too.
January 16th, 2010 at 11:54 am
My brother has an iPhone – do you think your pouch would fit it?
Second question – what do you think is a good fabric for men? I’d LOVE to make him this for his birthday….!!
So many projects, so little time….
.-= Jabba´s last blog ..Victoria Salmon Kings =-.
January 16th, 2010 at 8:51 pm
Great tutorial! I have been looking for a good iPod cover for a while but up until now, I have been unimpressed with the tutorials/styles I’ve seen so far. This one takes the cake, I’ll definitely be trying this out 🙂
.-= Jeni´s last blog ..Flickr Favorites =-.
January 16th, 2010 at 9:35 pm
Hey Jabba,
The pouch fits the iPhone width-wise, but not length-wise (the iPhone is a wee bit taller than the iPod Touch and sticks out at the top). The answer to this question is slightly complicated by the fact that the different generation iPods all measure a bit differently. That said, I have made iPhone covers before and I believe I used about 11″ long pieces. Should work!
My advice? Measure the circumference of the iPhone the long way around (that is, take a flexible tape measure, and wrap it around the long way). Add one inch to it (for the 1/2 inch seam allowances at each end), and that’s about how long your lining and exterior pieces should be. Good luck!
As far as manly fabric – that’s ALWAYS the hardest part! Something geometric might work, and if all else fails, solid colors aren’t the worst, but kind of uninspired…
I’d love to see what you come up with!
-Robyn
January 16th, 2010 at 9:36 pm
Jeni, thanks so much! I hope you get some good mileage out of this tutorial. When you’re done, I’d love to see some pictures posted in the Flickr group! Let us know how it goes.
-Robyn
January 17th, 2010 at 8:14 pm
Wow – that was a brilliant tutorial!
Thanks- can’t wait to try it out!!!!
January 22nd, 2010 at 8:29 am
Hi Robyn, I tried your tutorial today and blogged and linked back to you. I changed a couple of things (due to the fabric being cut already) – but all in all it worked out nicely. Your tute photos make it all very clear – well done!
March 4th, 2010 at 10:12 pm
This looks awesome. My husband just got his own iPod touch and I can’t wait to try this out.
March 17th, 2010 at 4:57 am
Thanks, Carolyn! Let me know how it turns out. I’d love to see photos of what you make! Feel free to put them up at the Flickr site, too!
April 2nd, 2010 at 6:26 am
I just bought an iTouch after running out of space on my iPod! I am excited about making a cover for it using your tute! Thanks!
April 28th, 2010 at 12:29 pm
Congrats! You were featured on C&T’s blog! Check it out:
http://www.ctpubblog.com/2010/04/28/creative-trouper-hot-project-round-up/#comments
July 24th, 2010 at 9:48 pm
I just finished making this its worked out so well 🙂 thanks so much for this tut
November 10th, 2010 at 11:30 am
[…] cover – Instructions HERE from Dog named […]
November 20th, 2010 at 1:00 am
[…] Touch Cover Robyn of Dog Named Banjo shares an iPod Touch Cover which will hold your favorite device safely in a snazzy […]
November 20th, 2010 at 2:44 am
great tutorial. very detailed and great pictures. thanks
November 20th, 2010 at 12:40 pm
Great tutorial! I tried something like this as a bag for some tarot cards and totally botched it. I can’t wait to try this. Thanks!
November 20th, 2010 at 11:35 pm
I came over here for your great tutorial, but *had* to leave a comment because I totally agree with you about the Bic mechanical pencils. They are quite simply the best and now you’ve got me a little paranoid, too… must go get a pack just to keep around.
Thanks for the great tutorial. :0)
November 29th, 2010 at 5:40 pm
thanks for a great tutorial. Is there a way to get a pdf of the tutorials?
December 12th, 2010 at 1:30 am
[…] più piccolino, un porta ipod touch (Dog named […]
December 13th, 2010 at 8:02 am
Fantastic, what a wonderful tutorial. Really well explained and excellent photography.
I’m going to try this out for a Kindle cover 😉 I’m new to sewing so this will be a nice challenge for me.
Is it ok to link to your tutorial on my blog?
Best wishes
Billie 🙂
January 24th, 2011 at 12:58 am
[…] used this tutorial I found online, which is designed for an Ipod touch. My first go at it came out […]
February 4th, 2011 at 3:21 pm
So simply, did it under 40 minutes. Love how it came out.
November 13th, 2011 at 6:30 am
thanks a lot for this great tutorial. just made a cover for my new phone following your instructions (adjusted the measurements) and that made my day.
December 21st, 2011 at 10:39 am
I used this for a Christmas present, and be damned if I didn’t apparently screw up some measurements or seam allowances or something. This ended up about 3/4″-1″ too small width-wise for the newest iPod Touch. 🙁 But she still used it for her phone, so huzzah I guess!
December 29th, 2011 at 9:50 pm
Thanks for sharing your tute. I modified it for a kindle touch and used batting instead of fusible fleece. It turned out beautiful.
January 21st, 2012 at 5:34 am
Lovely and thanks for sharing! This would make such a perfect gift.
August 2nd, 2012 at 1:24 pm
Hey, thanks for this tutorial! It is just the thing I need to go with my mom’s new iPod Touch. She is gonna flip when she sees it, because it is *that* cool. THANKS
February 3rd, 2015 at 3:45 am
[…] past Christmas (2011), she wanted to give the kids some cool iPod sleeves. She had her heart set on this iPod sleeve, designed by Robyn at Dog Named […]