Buy PodPillows!
Categories
Archives
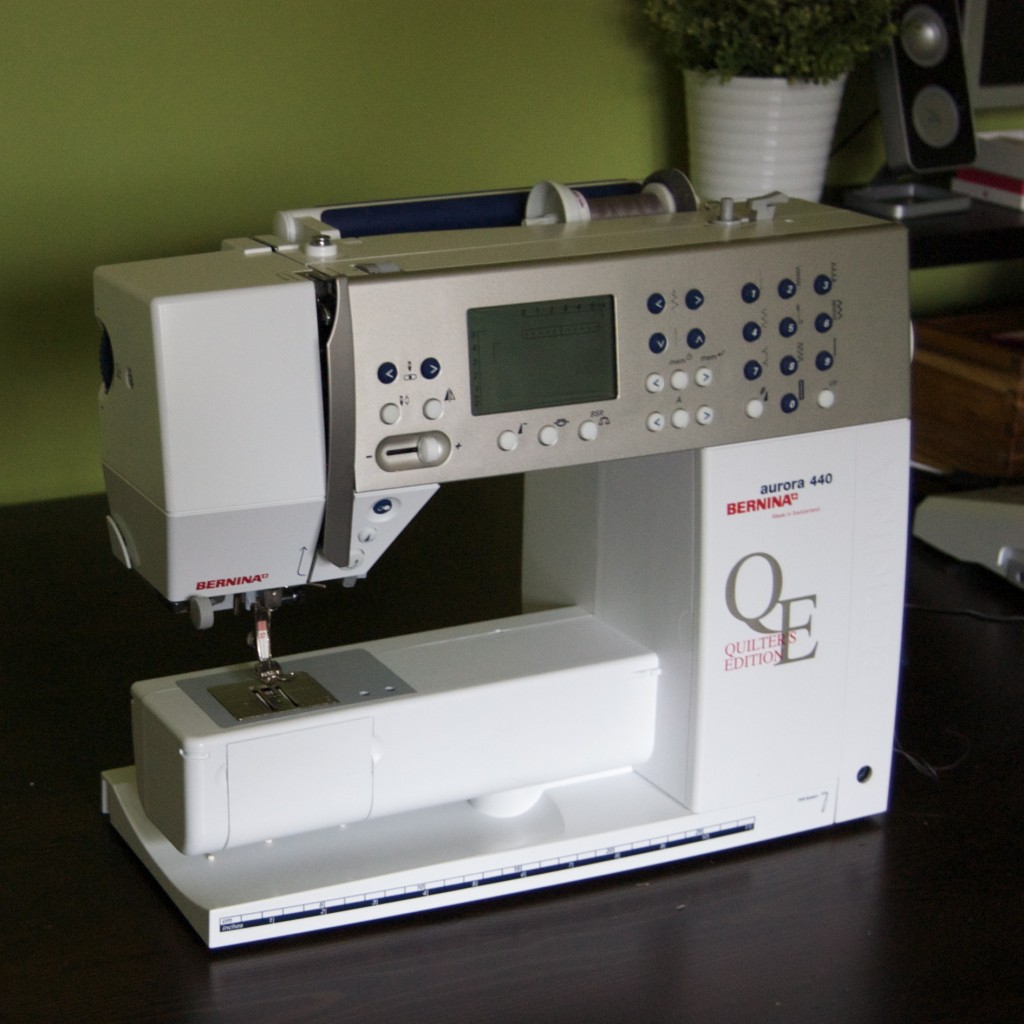
Bernina 440QE: Cleaning and Oiling Your Machine
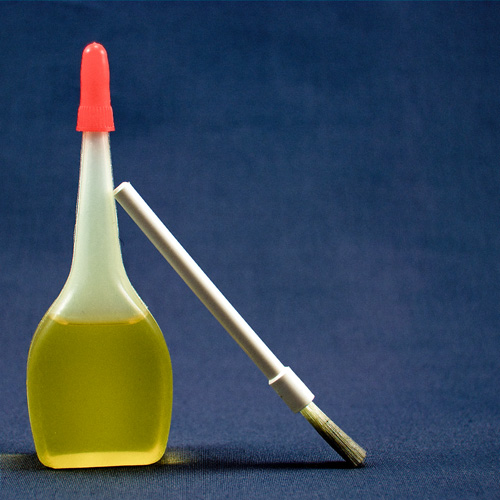
Each year around the holidays – or more specifically, while I’m in the middle of the holiday sewing craziness – I lament about how infrequently I manage to perform the maintenance that I know my machine so desperately needs at this time of year: cleaning and oiling!
First, the procrastinator makes an appearance: “Just one more bobbin.” or “When I’m done with this quilt!”
Next, denial sets in: “Wow, where are all these fuzzies coming from? Must be this batting.” or “Really, I’m sure that ca-chunk-ca-chunk-ca-chunking is just the dishwasher.”
But the dirty dishes are still piled up, and your projects continue to flow through the machine, one after the other. And you don’t do it. Or at least, I don’t. Not nearly enough.
But there’s no excuse! It’s so easy and takes about 3 minutes. Below are the steps for you to do it yourself. At least someone will be cleaning their machine, even if I’m not.
Cleaning and Oiling Your Machine
Getting started: Unthread your machine and put it in the “needle up” position. Turn it off. Find your brush and oil. The ones pictured above came with my machine.
Step 1 – Approach: Quietly, gently approach the machine in its native habitat. Speak in soothing tones, so it doesn’t suspect anything.

Hunting for fuzzies.
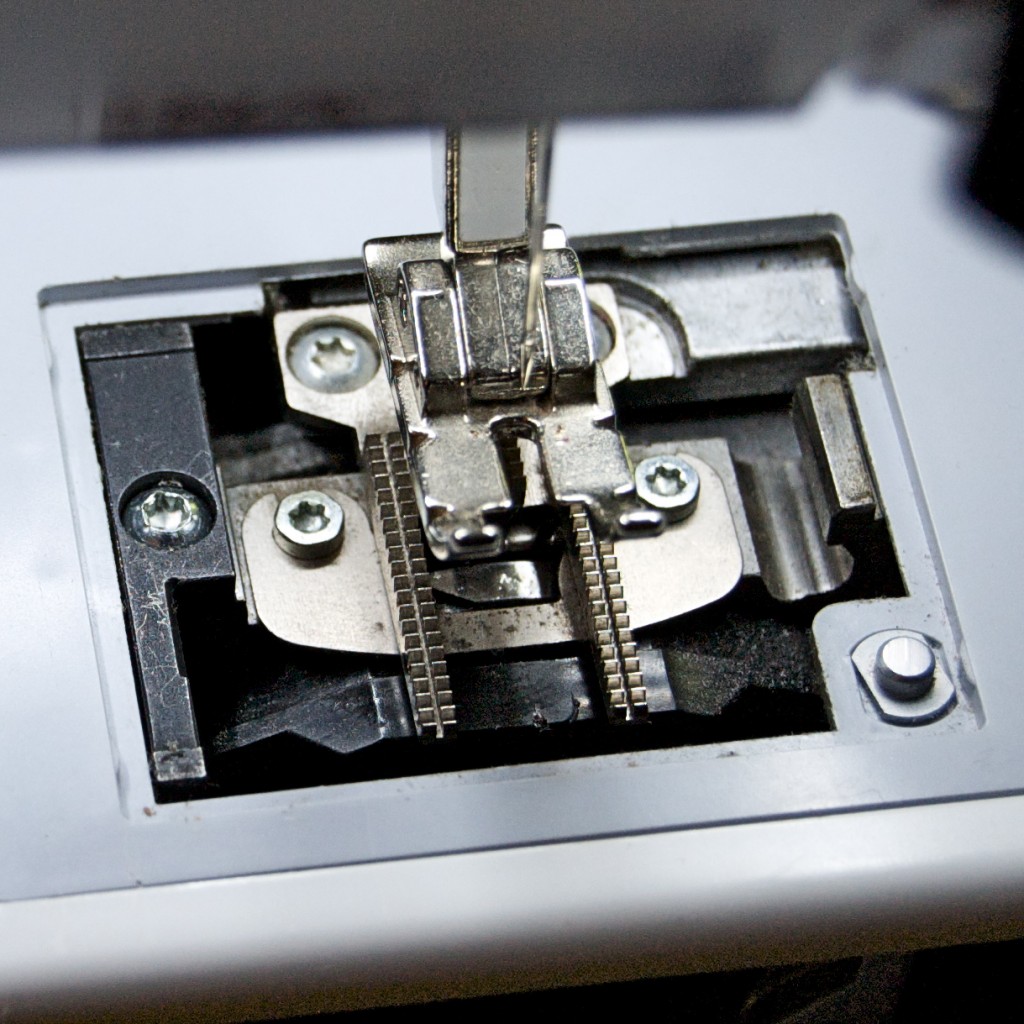
Step 2 – Open the top: Press open the stitch plate beneath the presser foot and remove it.

Run! Here they come!
Step 3 – Defuzzify: Brush out all the fuzzies and gunk, bits of broken needles, toast crumbs, dog hair, extra threads, whatever else is stuck in there:
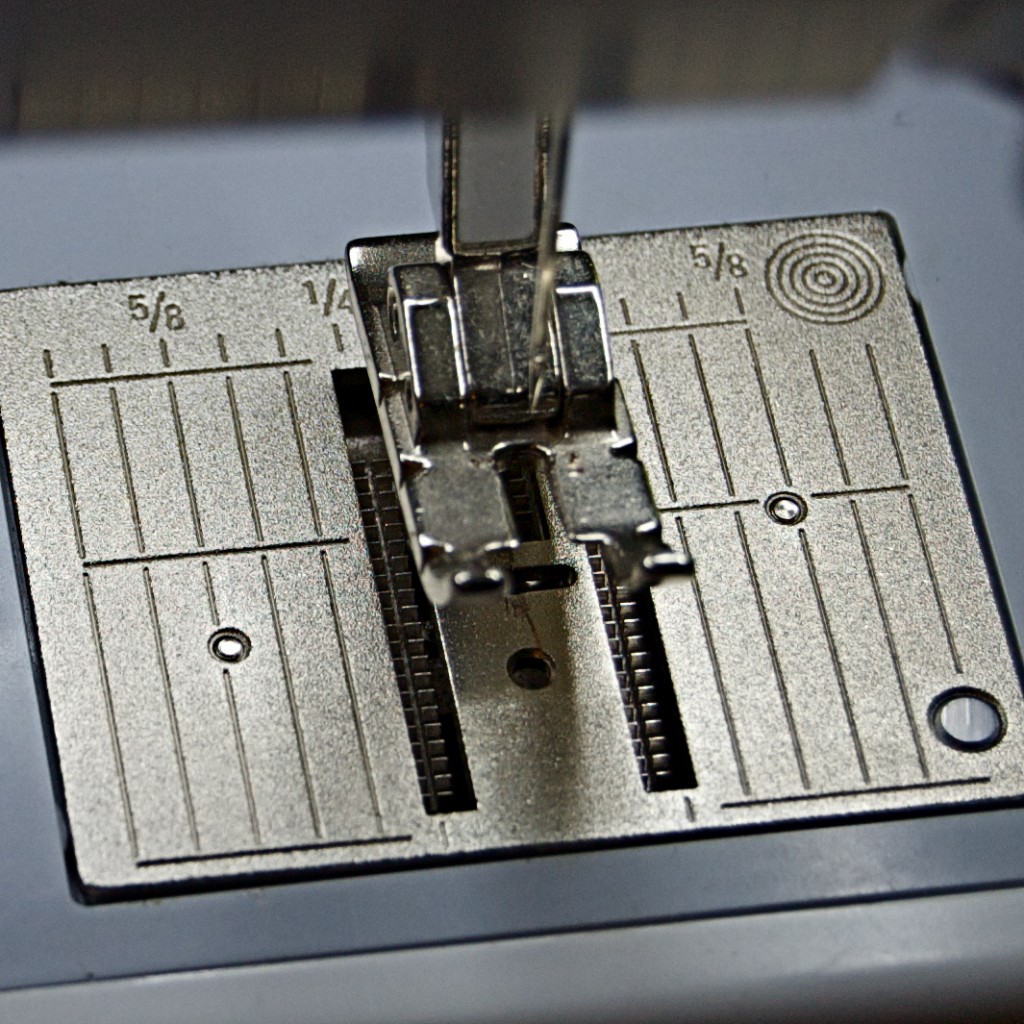
Step 4 – Appreciate: Admire your clean machine top, and replace the stitch plate:
Step 5 – Bobbin area: Open up the bobbin door, and remove the bobbin. Clean out the fuzzies you can see.
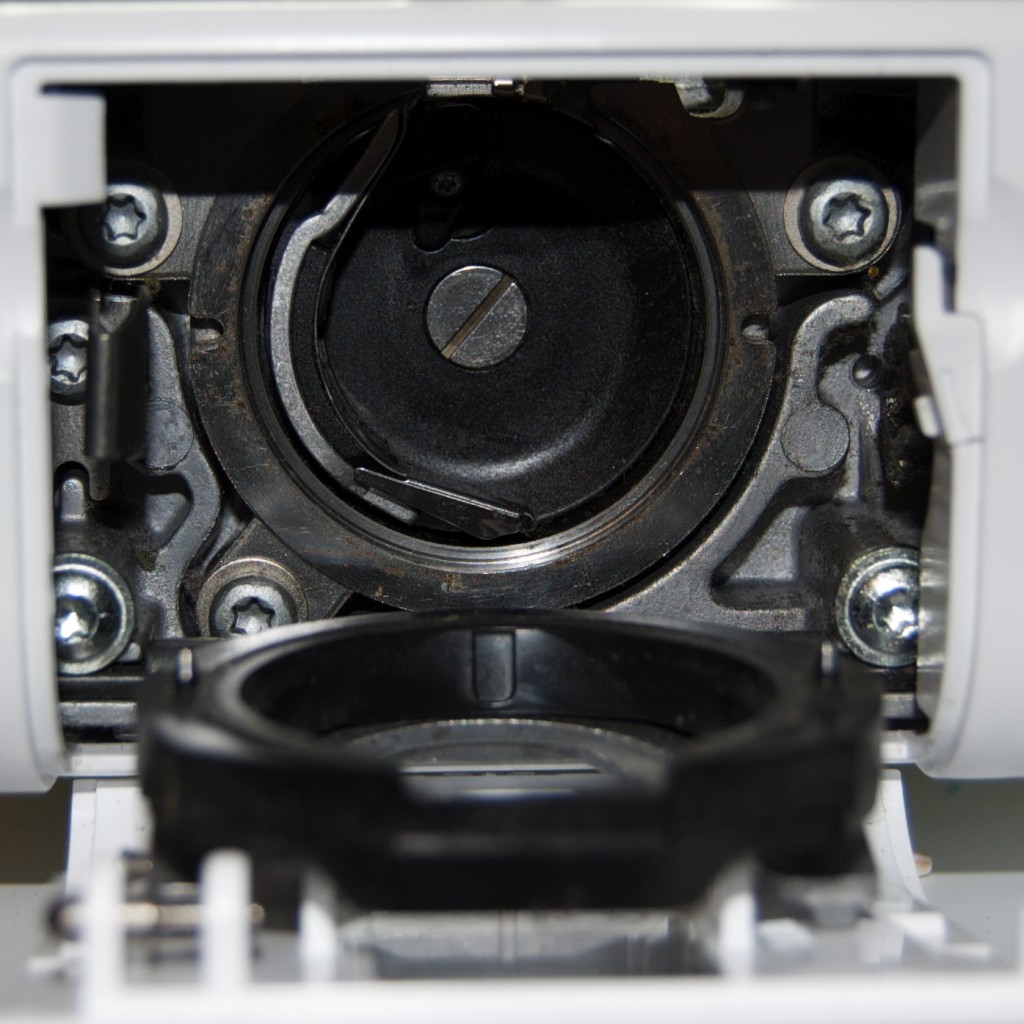
Step 6 – Release the bobbin hook: Now, release the housing that holds the bobbin hook in place. There’s a handy little lever on the top left of your machine to release it. Push this lever to the left to release the housing. The housing will flop down:

Press the lever on the top left of your bobbin area to release the metal/black plastic housing. Not so conveniently for this tutorial, my thumb is covering it up.
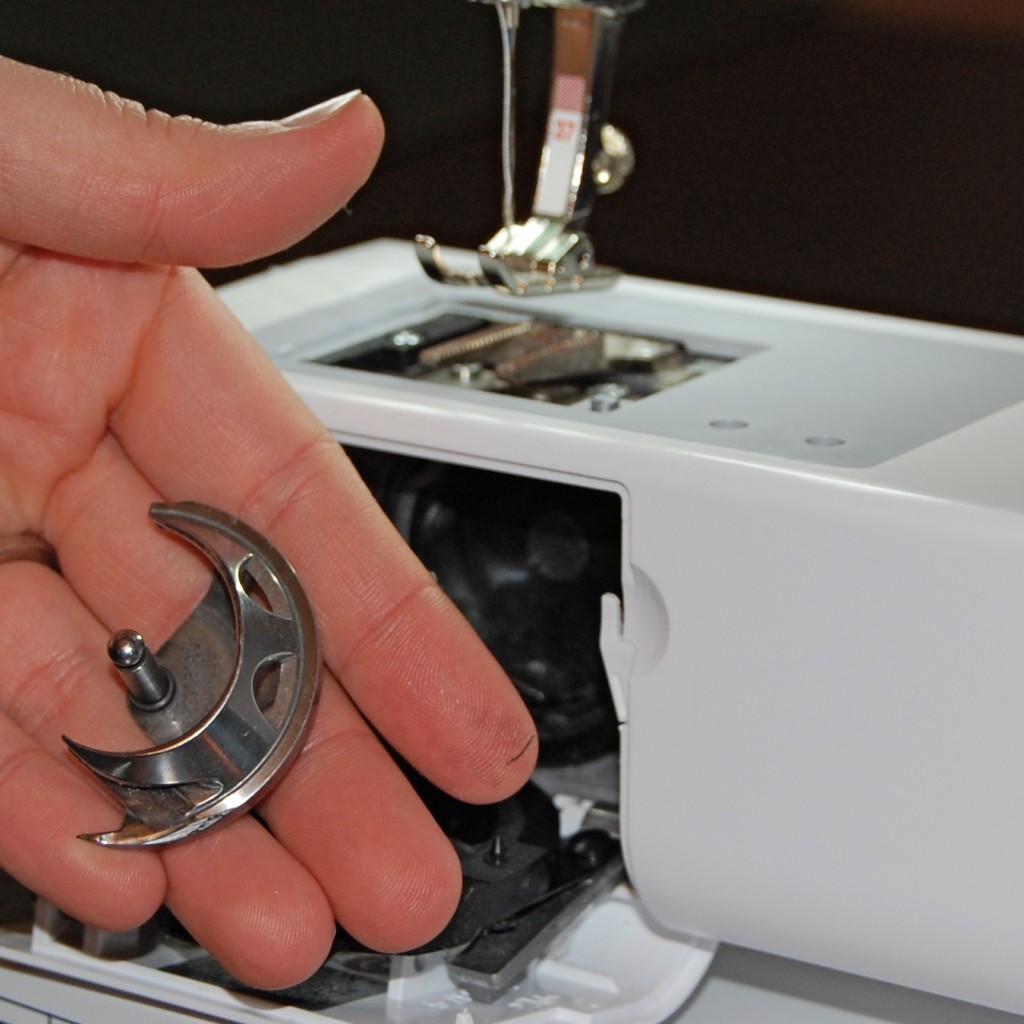
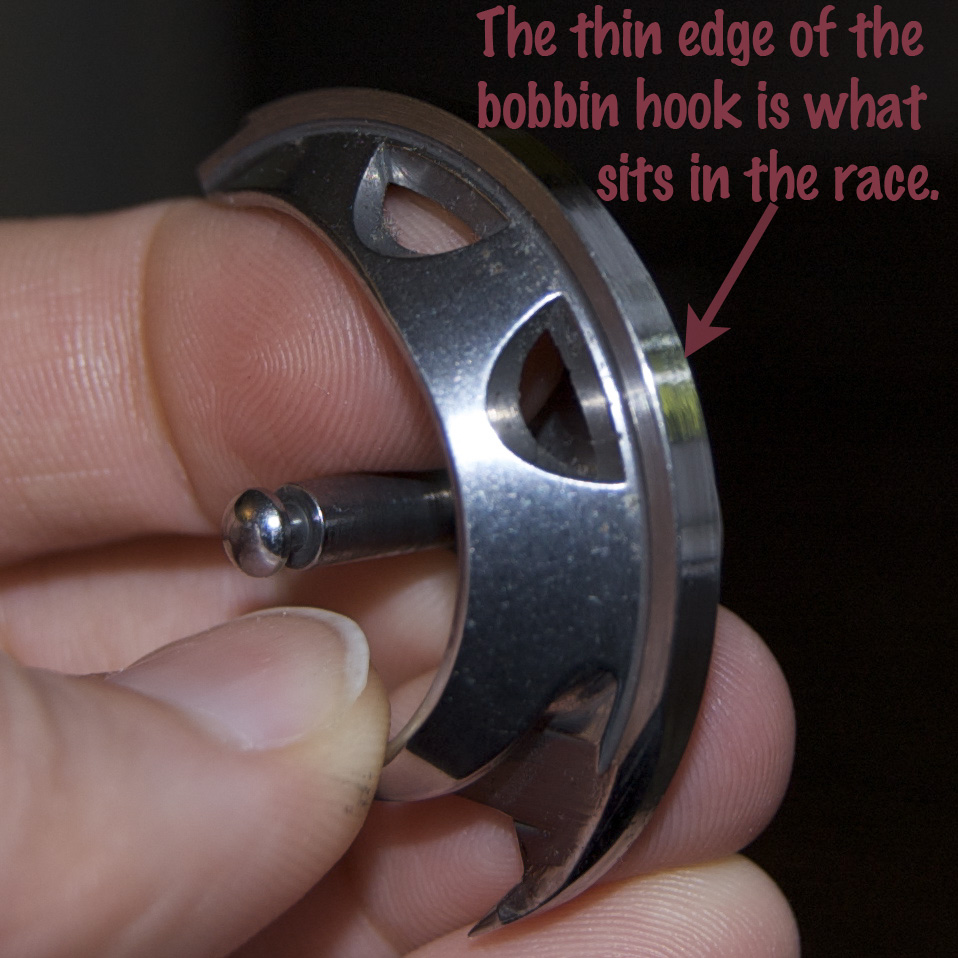
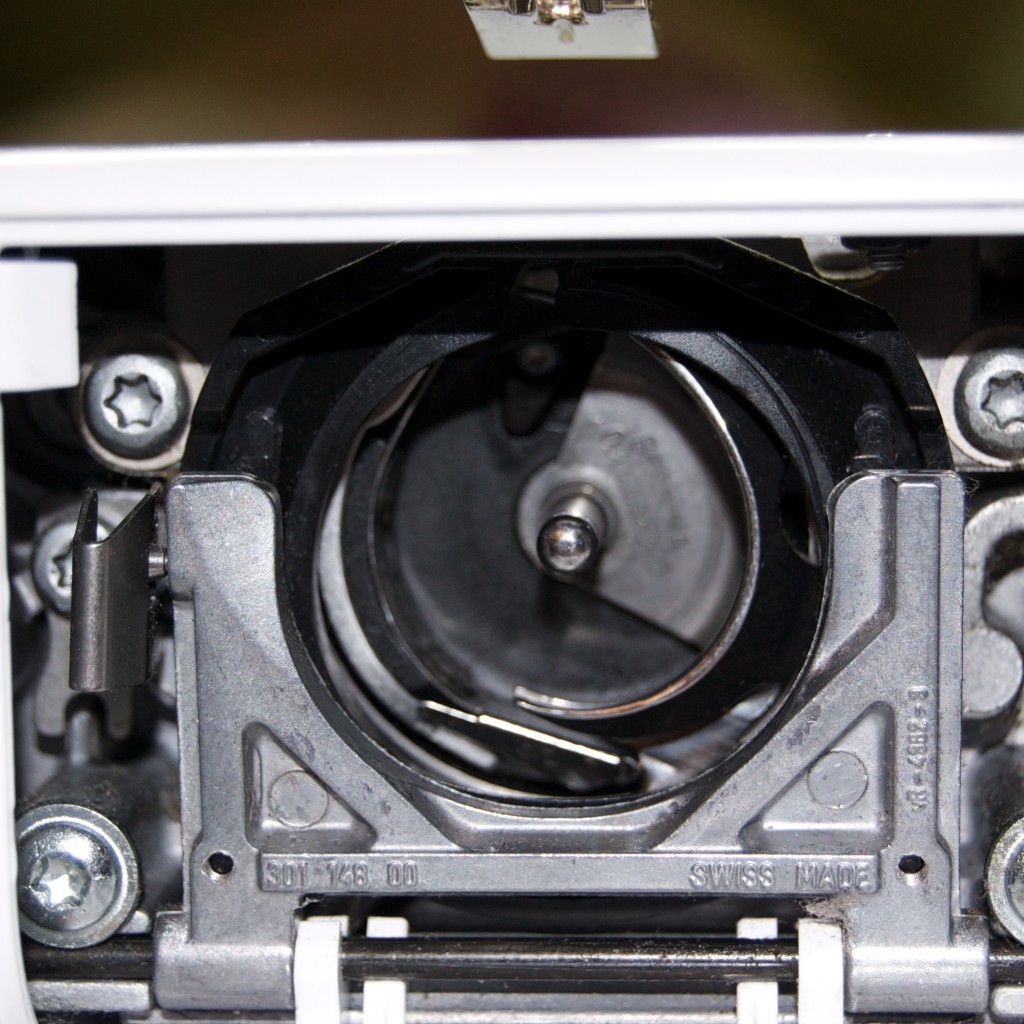
Step 7 – Remove the Bobbin Hook: Open the bobbin housing and remove the spiky part that sits on the right-half of the bobbin area. This is called the bobbin hook. It’s the part that rotates around the bobbin and makes stitches.
This is what it looks like up close:
Step 8 – Clean like the wind!: Now clean out the hook and the rest of the bobbin area with your handy little brush so it looks like this:
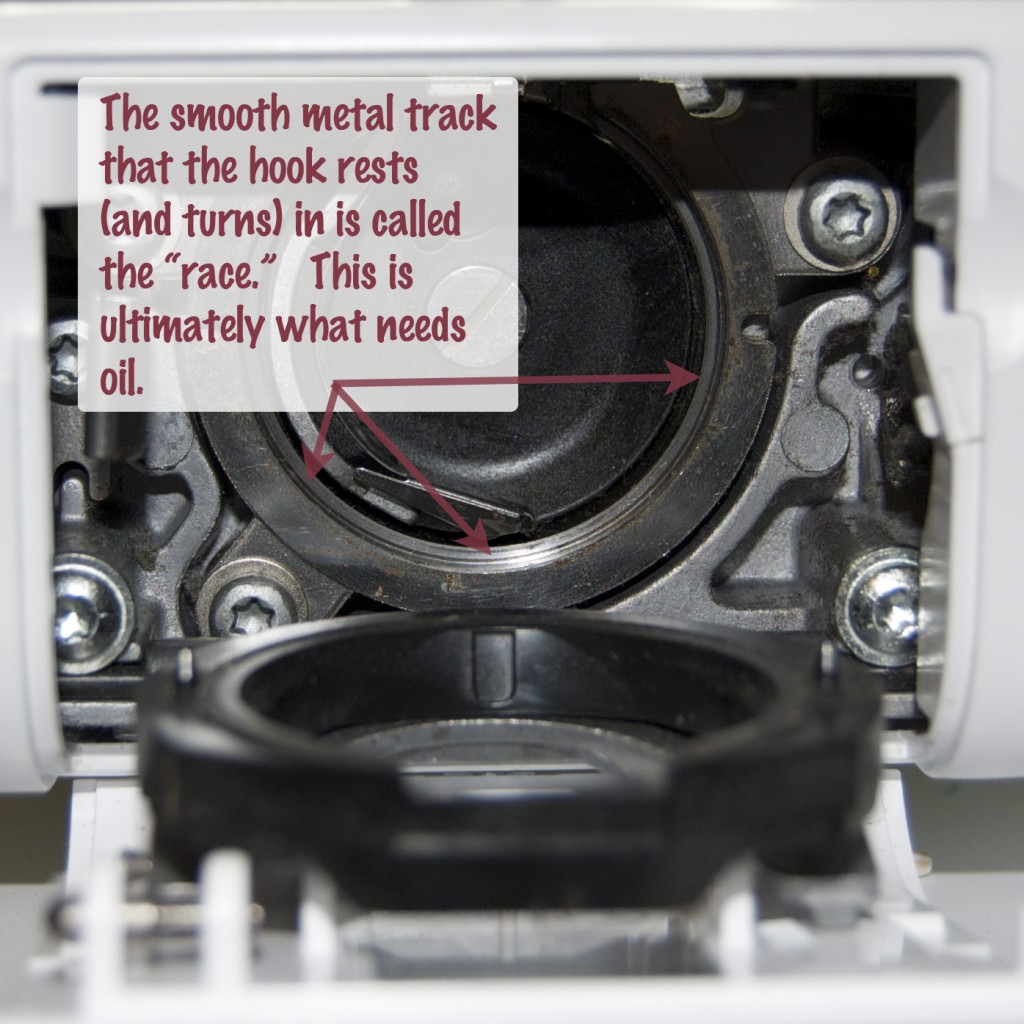
Diversion! – Understanding the inside: Small side trip! The bobbin hook sits inside the housing and “races” around in a circle while you’re sewing to make stitches. The little track that it goes around on is called the race. Ultimately, this is the part that needs the oil on it.
There are two different ways to get oil onto the race. Are you ready? 3, 2, 1…
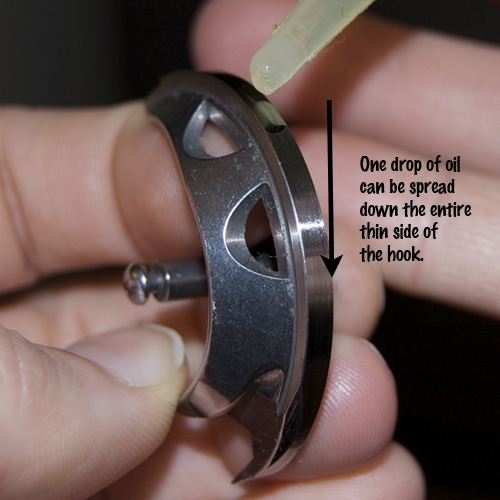
Step 9 – Option 1 – Oil the Hook:
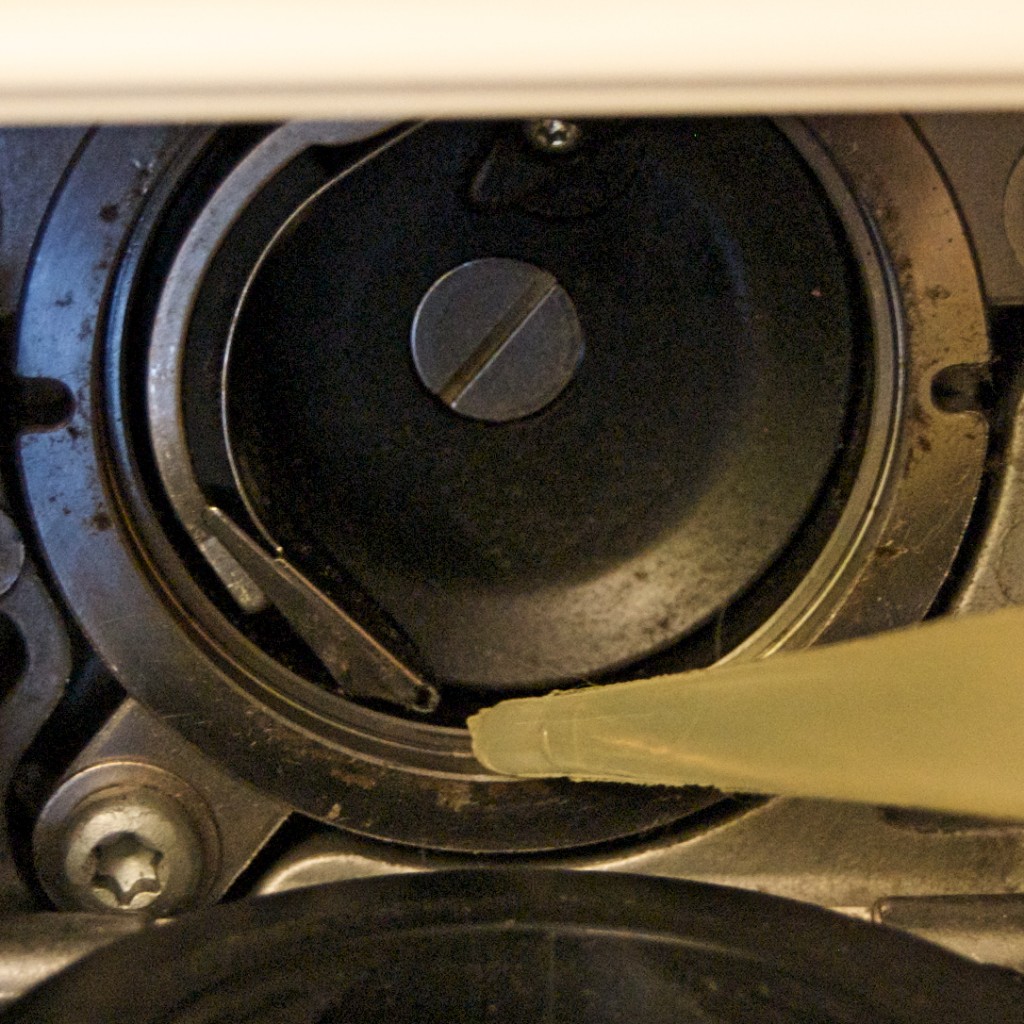
Step 9 – Option 2 – Oil the Race:
Place one drop of oil at the bottom of the race hook.
Please note: You only need to do ONE of the above methods. You DO NOT need to do both. When you’re done with your chosen method, the rest of the steps are the same:
Step 10 – Put Humpty Back Together Again: Reinsert the hook into the race and close the housing again:
Step 11 – Run the machine and listen to it purr: As the hook turns in the machine, oil will be distributed along the race. Run the machine without any fabric in it until the oil is distributed. This saves you from the disappointment of getting a bit of oil on your project as the machine settles in to its new-found lubricated state. Machine sounds better, doesn’t it?
When should you oil your machine?
I’ve heard a lot of different things: Every bobbin, every 3-5 bobbins, at each needle change, every day, never… But my rule of thumb is usually the following:
1) After using up 3-5 bobbins.
2) When it start ca-chunking – sometimes the machine just sounds like it needs oil. When this happens, I oil it. It’s possible that it hits this mark after the 3-5 bobbin stage, and comes from my minor neglect, but I will deny this if anyone asks. 😉
3) When Bernina tells you you should – Bernina will display a cute little oil can icon on the front of the machine after about 180,000 stitches, indicating that it’s time to oil. Almost all the sewers I know oil more frequently than this, but it’s a good reminder to get once in a while, and it’s a cute icon, to boot!
![]()
What you shouldn’t do when oiling: Compressed Air
People say that compressed air is ok for the older mechanical machines that are not computerized. However, most sewing pros I know don’t use compressed air on their computerized machines, for fear of blowing the dust into the internals of the machine and messing something up. I’m not sure I buy it completely, but better safe than sorry! I steer clear of it just to be sure!
Hope this little tutorial was helpful. Happy cleaning!
Posted by robyn on December 31st, 2011 under bernina 440 qe, crafts, sewing, sewing machines, tutorials







January 1st, 2012 at 7:43 pm
Thanks so much for thsi how-to! I was hearing some ca-Chung while sewing today, so this is my next task before getting back to sewing tomorrow. Happy New Year!
January 1st, 2012 at 8:44 pm
Thanks for the reminder. I have the same machine. My oil was the same color as yours and a Bernina repairman told me that my oil had gone bad. It should be clear in color.
January 2nd, 2012 at 1:35 am
Thanks for the reminder. I normally oil it when the sign comes up but it won’t hurt if I do it again tonight
Sewing Princess´s last blog post ..Comfy yet fashionable
January 3rd, 2012 at 10:03 am
Fantastic tutorial. Thanks for sharing!
January 3rd, 2012 at 10:11 am
..wow, thanks for this simple tutorial, I had no idea I should be oiling my bobbin ‘race’. Gonna do that today before I start sewing. I have a different model but the bobbin area is the same. Thanks again!!
January 3rd, 2012 at 10:12 am
THANK YOU!!!! I did NOT know about some of this!
January 3rd, 2012 at 10:37 am
I like to clean my machine after each project.
January 3rd, 2012 at 10:47 am
HOLY SMOKE, I am a BAD Bernina owner! I had no idea I was supposed to do this as often as now instructed; I do a perfunctory brush out of stuff but I’ve never oiled the machine (I was afraid to) and let the annual cleaning (which isn’t so annual, frankly) by the professionals do that part. I am SO thankful for this post and plan to spread the word. THANK YOU!!!!
Joan´s last blog post ..UFO to CG
January 3rd, 2012 at 11:01 am
Thanks for the pictures. I have been oiling but not taking the top plate off. When my little warning light came on I thought maybe I hadn’t been doing it right but I have except for the top plate. Thanks again for the pictures
January 3rd, 2012 at 11:04 am
Thank you for your tutorial. The pictures help knowing exactly where the oil is needed.
January 3rd, 2012 at 12:13 pm
Great tutorial. I’ve been oiling the wrong place!!! Thank you for this simple to understand post.
January 3rd, 2012 at 12:23 pm
Thank you for the great pictures! I’m never really certain where the oil should go!
Lynne´s last blog post ..Bernina 440QE: Cleaning and Oiling Your Machine
January 3rd, 2012 at 12:31 pm
Just like I would do it myself.
Good!
January 3rd, 2012 at 5:31 pm
What a CLEAR tutorial!! My Bernina says, “a million thanks!”
January 3rd, 2012 at 6:09 pm
Thank you for this WONDERFUL tutorial — the manual is so unclear about home maintenance. Your pictures are worth a thousand translated-from-Swiss-German words! 😉
I have a 200E and I don’t think I’ve ever seen an oil can icon pop up on the screen, but other than that the machines look pretty similar. And I had no idea I was supposed to take out the hook and bobbin guts to oil! I just always put a drop of oil at the bottom of the bobbin case area. Not sure if that helped or not…
I also didn’t think I needed to oil that frequently. I definitely have gone through more than 3 or 4 bobbins on the quilt top I’m piecing. Maybe it’s time to give my sewbaby a Spa Day with some oil and a lint brush massage!
Rebecca Grace´s last blog post ..Happy New Year 2012! Cheers, Hugs, Movies and Champagne Bubbles Headed Your Way
January 3rd, 2012 at 6:12 pm
…By the way, I know canned air is a no-no because it blows dust and lint inside the machine, but I have a little attachment kit that I can hook onto a Dirt Devil handheld vacuum to suck lint and dust OUT of the machine if I’ve made a glorious mess with something like Minkee plush. The tiniest vacuum nozzle in the kit is smaller than a toothbrush head, so it gets into all the nooks and crannies.
Rebecca Grace´s last blog post ..Happy New Year 2012! Cheers, Hugs, Movies and Champagne Bubbles Headed Your Way
January 3rd, 2012 at 7:58 pm
Thank you so very much ! Very clear Tut !! Happy New Year Sewing ahead !
January 4th, 2012 at 1:10 am
Thank you for sharing! Now I know what to do exactly.
January 4th, 2012 at 6:11 am
A great tutorial with illustrations. Many thanks to you for putting this together!
Amy C´s last blog post ..Design Wall, Jan 3, 2012
January 4th, 2012 at 8:52 am
What a SUPER tutorial! I clean out the fuzzies with every bobbin change but don’t oil often enough, mostly because I don’t know where to put the oil! I LOVE your pictures and description. Now, where do you oil a 730E? The Bernina manual just isn’t clear enough…
January 5th, 2012 at 1:11 am
Fabulous article. I have always been fussy about cleaning and oiling my machine, but as I did not have any illustrations to be sure that I was doing it right! Best article on maintenance ever!
January 5th, 2012 at 7:00 pm
Thanks for the great info. Bernie’s are a thirsty bunch. I wouldn’t trade them for anything but they do need oil frequently. Yellow oil is starting to thicken – get some new oil, inexpensive insurance for good sewing.
January 9th, 2012 at 10:07 pm
Absolutely wonderful information in all your tutorials. Bernina website would do well to pay you for these! You had better copyright them before Bernina steals them! I was very frustrated by the lack of info on the Bernina site when I was looking into which machine to buy and then afterwards when I needed info on how to use it. Thankyou so much. I am really getting itchy feet wanting to get back to my machine but here in Oz, January is a busy holiday month and we have a house full of visitors which is also good fun.
January 17th, 2012 at 9:23 pm
Thank you so much for this tutorial! I got a Bernina 440QE for Christmas and I love her 🙂 But I live on a Pacific Island and can’t have her serviced professionally here so this information is perfect for me! I’ve started blogging about my adventures with my 440 as I didn’t find much information when I was researching before I purchased it. Although I must say, your blog helped me make my decision. Thanks again!
January 19th, 2012 at 10:55 pm
A million thanks! The pics in the manual are terrible and I was never quite sure if I was putting the oil in the correct place! Good advice about the 3-5 bobbins, i was just waiting for the oil can to show up! I clean under my stitch plate quite often, but am always surprised how much accumulates under there. Last time I swear a Muppet tried to
January 19th, 2012 at 10:56 pm
Climb out from under there! Thanks again!
January 26th, 2012 at 1:48 am
I’d like to add my thanks too, having found your tutorial today (thank you Google!) … Great pictures an description, much better than the Bernina manual. I couldn’t get the bobbin hook back in right until I came here. Ditto for your walking foot post. So many thanks, I’m sure I’ll be back.
January 26th, 2012 at 3:02 pm
Great! I just used your method. It is great! If I understand correctly I should only oil the down part of machine and nothing else?
Lelie´s last blog post ..Flickr problemen 🙁 Hulp gevraagd
January 27th, 2012 at 2:14 am
Thank you so much for this. I am a brand new 440 owner and was embarassed that I had no idea how to oil my machine.
March 6th, 2012 at 8:25 pm
Thanks everyone, for the great feedback. I’m glad you found the tutorial helpful! Based on comments, looks like I need some new oil. Interestingly, the oil was yellow when I got the machine. Not sure if it’s gotten worse with time?
March 6th, 2012 at 8:27 pm
Hi Lelie,
You have two choices for oiling – one on just the race – the inside of the bobbin case, the part that’s attached to the machine – or on the side of the hook. Hopefully that makes sense!
March 6th, 2012 at 8:28 pm
Thanks for the kind words, Jill, and glad you found both tutorials helpful!
March 6th, 2012 at 8:29 pm
Wendy, the thought of a Muppet crawling out of my machine is kind of scary, but at the same time, joyful! How cute would that be! 🙂
March 6th, 2012 at 8:32 pm
Hi Nan – sorry about your late reply to your comment about oiling a Bernina 730E. I wish I could help you figure out how to oil the 730E, but I’ve never used another Bernina. Maybe this article would help? http://www.sewusa.com/Sewing_Machine_Repair/Bernina_Sewing_Machine_Maintenance/Bernina_730.htm
March 6th, 2012 at 8:33 pm
Hi Rebecca Grace,
That attachment you have for your Dirt Devil sounds perfect! It’s got me thinking I need to try out an attachment on my vacuum and see if that would remove the fuzzies more efficiently than a little brush. Good idea! -Robyn
March 6th, 2012 at 8:36 pm
Hi Joan,
So glad the tutorial about oiling your machine was helpful! I’ve heard from lots of people who actually have never oiled their machine (or only do so when the oil can comes on) and they’ve been fine. However, I definitely find that it makes the machine run and feel smoother and nicer to use if I oil. Good luck with your new routine! 🙂
Robyn
March 13th, 2012 at 6:42 pm
Just bought a new Bernina machine today. Glad I found your webpage and carefully read it. Great heads up and well presented so it was easy to understand and follow. My new machine will always be a well lubed loosy goosie. Thaks!
March 18th, 2012 at 1:46 pm
Another superb tutorial. Thanks so much for spoiling us!
March 22nd, 2012 at 10:47 pm
Can I just say, I love you. Delilah (my 440) jammed today just as I was finishing off the final trial of a pattern that I was hoping to put on my blog this afternoon. I had 5 minutes before I had to run the kids to the Dr, so all I could do was remove the needle, foot and bobbin casing. I worried for the next 2 hours. I have just walked in the door, sat the kids down with an afternoon snack, logged onto the internet, come straight to this tutorial, and voila! You showed me how to remove the bobbin hook. THANK YOU, THANK YOU, THANK YOU! My closest Bernina dealership is in Tahiti or Brisbane, both a flight away. Thank you so much! Hooray!
Gemma´s last blog post ..Men’s shirt into Princess Dress!
March 29th, 2012 at 6:36 am
Wow! Thanks for this. I got my sewing machine from my mother-in-law and although it’s not the same brand your cleaning guide helped a lot. The machine is purring right along with every stitch.
May 7th, 2012 at 6:33 pm
Thank you so much for the info. My Bernina just recently started cha chunking. Now I get it. I was starting to worry a bit. I will clean and oil it first thing in the morning. Thank you again. Great Tut!
May 11th, 2012 at 1:58 am
thank you so much for the tutorial. whilst i do take the lint out all the time, I was never sure where to oil. she now purrs like no tomorrow 😀
also a quick tip, use cotton buds to do the cleaning instead of a brush, it magically sticks to it rather than just fly out!
thanks again
Katha´s last blog post ..MA &ME
July 5th, 2012 at 4:55 pm
I just got the oil can, and dutifully oiled! How long does it keep flashing? BTW, I do oil more often than that, but I do alot of sewing, also. Thanks for all the great tutorials. I’ve bookmarked your site.
September 20th, 2012 at 7:14 am
THANK YOU for solving the mystery of exactly WHERE to put the oil in my 440! The photos made it all perfectly clear. Bernina should hire you. (SewCalGal steered me to your site for this tutorial, so I’ll be sure to thank her too.)
September 21st, 2012 at 10:52 am
I just wanted you to know your oil needs to be tossed. If its not clear it is old. Yours looks to be yellow. It may be my IPad monitor. I learned that tip from my Bernina tech. I have the 730 and the 830 and I oil and clean after every bobbin. I was told to do that with my first machine (the original 830) and just formed the habit. I’ve had no problems with my machines. The only reason I’m writing you is because I was told the yellow oil would gunk up the internal gears.
September 22nd, 2012 at 1:07 pm
Took SewCalGal’s suggestion to stop by and sure am glad I did! I clean and oil my machines all the time but I didn’t know to oil the race (not a Bernina owner) but it seems like such a great idea, that I’m going to start doing it. Thanks so much!
September 22nd, 2012 at 4:46 pm
I don’t have a 440, but I think this can apply to lots of other machines. You did a really great job with the demonstration and the explanation. Thank you.
October 4th, 2012 at 12:56 am
Thank you so much. As others mentioned above, I did’nt know exactly where to pur the oil. I have looked at your BSR-tutorial, sewing roo make over and sewing projects as well, and you have given me a lot of inspiration! Tanks again!
November 24th, 2012 at 12:03 pm
This was the best tutorial I have ever seen regarding machine maintainence. I was intimidated until I followed your great pictures!
Thanks,
January 6th, 2013 at 9:03 am
Perfect tutorial, just what I was looking for!