Buy PodPillows!


Categories
Archives
More PodPillows!

Hi everyone! Wow, it’s been a while. I’ve been busy, busy, and each time I let some time pass between blog posts, I get first post syndrome all over again. But I’ve gotten over it in time to say hello before next Christmas. Phew! And I brought some elephants with me to help break the silence.
I won’t bore you with details of what’s kept me away from Blogland, but just know that I’ve missed you all! Want to see some more PodPillows?


PodPillows: Now at Etsy!

Several PodPillows have just arrived in my Etsy store! Take a look!


PodPillow iPod/Mobile Device Stand

Recently we got a great book from friends with impeccable taste in food and cookbooks: Lorna Sass’s Whole Grains Every Day, Every Way. It’s a book with loads of recipes using grains you’ve (or at least I’ve) never heard of (amaranth, triticale, teff, kamut) and new ways to think about using those grains you already know and love (rice, corn, barley). It also contains words that I seldom see in many cookbooks not aimed directly at vegetarians: “Vegetarians will enjoy this as an entree.” Thus, it earns a prime spot on our cookbook shelf.
Also why I like this book? Ryan dislikes quinoa, which is my favorite Supergrain around, and I’m looking for a suitable replacement that doesn’t bring about the grimaces that that innocent, delicious, unthinkably healthy quinoa garners. Let’s just say that grains as an entree has never sat well with him, so this is going to be a tricky task. I think it’s best summed up that he’s a fan of whole grain vegetarian entrees, as long they’re just for the vegetarians. Add broccoli to that and we’re in deep trouble!
Now bear with me as I abruptly change subjects to the orange item in the above picture.
It’s an iPod stand! It gently cushions your iPod in an upright position on your desk, sits on your knees during that long car trip, or perhaps adorns your airline tray on that cross-continental flight as you take in the latest movie downloaded from iTunes. It may also accompany you to Panera, as you grab a bowl of soup after Target and before HomeGoods. They have free WiFi, and I know you like to do a quick check of the email and the NYTimes headlines before going in search of the perfect discount 400 thread count sheets, right?
So what does this have to do with the price of buckwheat in China? Well, it appears that Lorna left out a chapter in her book, somewhere between “The Rice Family” and “Green Spelt.” I believe this chapter should be entitled “Alternate uses for grains your husband won’t eat” and it should have one of these iPod stands as its cover shot. I believe the PodPillow has just become Ryan’s most favorite craft ever to come out of the Dog Named Banjo workshop, because I’m emptying our pantry of dry grains to fill them with. Today alone I depleted our supply of dry lentils, split peas, and barley. (These actually almost earned the name of “The Lentil Lounger”). Much to his delight, I’ve even threatened to sacrifice my brand new bag of buckwheat for this little project. And anyway, I bought the buckwheat at a Russian market, and can’t read the label so I really have no idea if it’s even buckwheat. I need a translator!

These will be arriving in my Etsy shop in the coming days. I’ll make sure to post here when they’re up!
Posted by robyn on January 20th, 2010 under crafts, random, sewing | 8 Comments »Craft Hope for Haiti

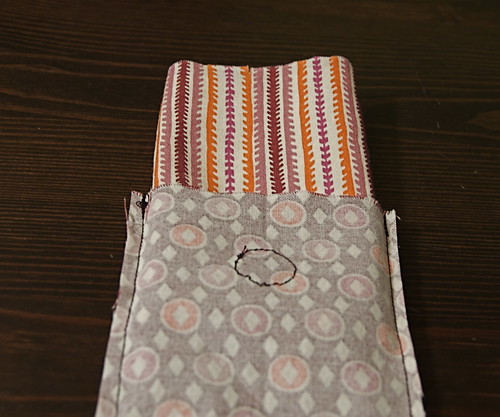
In case you all haven’t heard about Craft Hope for Haiti, it’s an Etsy store that is taking handmade donated items from crafters everywhere and selling them to raise money for the relief effort in Haiti. All money received will go straight to Doctors Without Borders for Haiti.


This is the item I’ve donated.
Update: The pencil case has been sold, and in short order! Thanks to all for your interest!
It’s a great cause. Please donate something, or if you’re not a crafter or cannot donate, please browse the Etsy store and find a little something to take home for the cause.
Posted by robyn on January 19th, 2010 under crafts, random, sewing | Comment now »
Tutorial: iPod Touch Cover!

Hello my music-listening, smart-device-toting sewing friends! Some of you may recall my little green iPod cover (that, incidentally, never got its own blog post, but has made some special (or stealthy) guest appearances in some posts about other bags (like here and here!)). Not only have you observant readers spotted it in a few places, but a several of you have asked for a tutorial. So, let’s call this my overdue New Year’s gift to you! I hope you find it useful and fun to make. You will have your iPod tucked into a cute, padded, and protective cover in just about 1-2 hours or so with this little photo-full instructional guide.
If you’re looking for a killer accessory duo for your iPod or other smart device, check out my PodPillows on Etsy!
If you make a cover from my tutorial, please consider uploading some photos to the Dog Named Banjo Tutorials group pool on Flickr.
– one 10″ x 3 3/8″ piece of quilting-weight fabric for the outside.
– one 10″ x 3 3/8″ piece of quilting-weight fabric for the lining.
– one 9 1/2″ x 3 1/8″ piece of thin fusible fleece.
– one 1 1/4″ x 2 3/4″ piece of exterior fabric.
– one 1 1/4″ x 2 3/4″ piece of lining fabric.
– one set of Velcro dots (if you don’t have the round dots, you could also cut small squares for this – no biggie!)
– some double-sided sewing tape. This is optional but a useful tool!
– an iPod Touch! (also optional, especially if you’re planning to give this as a gift!)
- You may notice that I’m using Denyse Schmidt’s Hope Valley fabric. Yum! Also, it’s perfect for this, because it’s non-directional. This tutorial works best with fabrics whose patterns don’t have a top and bottom. Know what I mean?
- Also, all seams are 1/4″ unless otherwise specified (like in that one spot later on in which I specify a 1/2″ seam).
- Just to be clear, I created this tutorial based around my 8GB iPod Touch that I got a bit over a year ago. the newer iPods may have slightly different (thinner) dimensions.
Now that you know what you need, let’s get this show on the road.
")
Here's what it will all look like when it's cut out. The fusible fleece is at the bottom, and is totally in camo mode, trying to hide from the camera against the white background!
That wasn’t so bad, was it? You can now rest your cutting muscles, but warm up your ironing muscles. Ok, next up – fusible fleece.
The fleece is sized to be slightly smaller than your lining fabric. You’ll want to center the fusible side of the fleece on the wrong side of the lining fabric, so it’s not actually touching any of the edges. This means that your seams won’t be quite as bulky when you finally sew everything together. Clever, no?

The two sides of the fusible fleece are pretty distinctive. You'll want to place the non-fuzzy side of the fusible fleece down on the wrong side of your lining piece. The fleecy part should be facing up! Don't forget to line up the fleece so that it's centered on the lining piece! None of the edges should be flush with the fleece.
Once it’s centered, flip the lining + fleece over so that the right side of the lining is facing up. Haul out the iron from the closet and warm up that bad boy to the wool/steam setting.
Stretch… crack your knuckles. One, two, three… Fuse!

No need for a press cloth or for anything fancy. Just go over the entire piece a few times with your normal ironing motion! It should fuse the fleece enough for the purposes of this project.
3. Fold lining in half and sew the long sides of lining together
Fold the lining in half widthwise, right sides together, so the two short ends are together. The fuzzy part of your fleece should be facing out, like so:

Fuzzy side out, right sides together!
Pin the sides together, and sew both long sides of the lining. Do not sew the top or bottom – just the two long sides!

Hey look! The Bernina has snuck its way into another tutorial, and this one's not even about it. Not to fear... She'll get another of her own tutorials soon!
4. Attach velcro to outer fabric
First, fold your outer fabric in half lengthwise (long edges together) and finger-press so that you can see a slight crease, as in the picture below. This will help you to get the pesky Velcro centered on the fabric when the time comes to sew it on.
Grab one part of your Velcro pair. I like to put the firm (not the fuzzy) part on the main body of the iPod cover, so reach for that one.
Now, reach for your double-sided tape, if you have some. (If you don’t reach for some pins.)

If you have it, attach a little double-sided tape to your Velcro. It's a piece of cake to sew on when it stays in one spot! Above, two pieces of double-sided tape with the backing still on.
Stick or pin the Velcro so that the top of the dot is 1″ below the top of the fabric. Now sew!

You can sew the Velcro on in a circle, or you can do a few straight lines to keep it in place. Up to you!
5. Fold the exterior in half and sew the long edges of together
Fold the outside in the same way that you folded the lining – widthwise, right sides together so the short sides are lined up together. Now sew a seam down each of the long sides. Once again, don’t sew the top or bottom edges together.

I just opened a new box of pins, and I'm adoring the little pink pearlescent ones. There's nothing better than a new box of fresh, straight pins! If it weren't for the publicness of the Internet, I'd probably still be using my old, horrifyingly bent pins that have definitely seen better days. Thank you, Internet!
Now let’s see what we’ve got. You should have two pieces that look like this:

Congratulations! You now have a completed exterior piece and lining piece!
5a. Trim the edges of each of the pieces
Is it unfair to have a 5a? Probably, but hey, they say not much in life is fair, right? Plus, this tough love attitude will get you a great finished product! Really!
Anyway, you really ought to trim about 1/8″ away from the side seams of both the lining and the outer pieces. Once you’re done hop over to number 6!
6. Attach fuzzy Velcro piece to the lining of the flap
Once more, reach for your pins or your double-sided tape. Center the Velcro, fuzzy side up, about 3/4″ from the bottom of your lining piece for the flap. Here’s a picture of the under-side of the Velcro dot with the double-sided tape, getting ready to be stuck to the fabric:

Flip the Velcro over, and it'll stick nicely to the lining, all ready for sewing. This picture shows the sticky part of the double-sided tape, all ready to adhere.
Now sew the Velcro dot to the lining fabric! Can’t you just see this all coming together? Your iPod Touch will soon have this adorable flap to hold it snugly in place.

Just like the other Velcro piece, it doesn't matter if this is sewn in a circle or in lines. Either way, just make sure it's secure! This sucker will get a lot of use if you're like me and taking it in and out of its pouch all day long!
Now take the exterior flap piece and the interior piece you just sewed Velcro onto, and place them right sides together. Sew three sides together – the two long sides, plus the short side closest to the velcro you just sewed on. Leave the remaining short side open, like below.
Trim the three sewn sides, and make diagonal cuts at the bottom corners. This is to reduce bulk when you turn this sucker inside out. Take care not to cut your seams!


Now turn the flap inside out. Beware! This flap is small. You should invoke the help of something pointy (but not sharp) to help you turn it inside out. This is by far the most challenging part of the tutorial! I rely on my stash of trusty cheap Bic mechanical pencils.

Sidenote: I love these Bic pencils and have massive quantities of them, lest they go out of business some day. I will always buy the 50 packs when I find them in stores (which is less frequently that I used to). See? Perhaps I'm right to be paranoid! I'm not sure why I love them so much, but I do.
All done turning? (Did you invoke your favorite mechanical pencil?)
Now give it a quick iron, and topstitch the three sewn sides, leaving the opening… well… open.

It should look about like this when you're done!
Yay! You’re done with the flap!
You’re almost done! Take a sec and lay out what you’ve done. If you turn your lining right side out, the pieces you have in front of you should look something like this:

A clever little trio of pieces!
Ready to move on to the last steps? All that’s left is the final assembly.
10. Place the lining bag inside the exterior bag
First, make sure the lining is right-side out.
Next, make sure the exterior piece is right-side in.
Third, insert lining into the exterior, like so:
Think of these as individual little bags. Insert the lining bag into the exterior bag. Put it in all they way so the edges are flush!
Once you’re done, the top edges of the lining pouch and the exterior pouch should be flush. Line up the exterior seam with the lining seam on each side. It’s these little finishing touches that make all the difference!
Now, mark the center of the back of the pouch:

A handy trick is to just fold the entire thing in half lengthwise (long edges together) and mark the center fold.
11. Place the flap between the lining and the exterior
This one gets its own step because it’s kind of tricky to explain. Thankfully, I have visual aids! (This is the part where, in real life, I might whip out a Powerpoint slide presentation, plus some props, to demonstrate the technique. Alas, this isn’t that kind of real life, I guess! Today we’ll use annotated images instead!)
Insert the flap between the back of the exterior pouch and the lining pouch, making a flap sandwich. Make sure that you don’t place the flap on the same side as the Velcro that you put on the body of the exterior pouch!

Hopefully you can tell where the flap gets inserted. Make sure the fuzzy Velcro and the lining side of the flap is facing the lining and the exterior of the flap is up against the exterior pouch. Just think - exterior to exterior, interior to interior!
Push the flap down all the way so that the opening is flush with the edges of the lining and the exterior. Now pin it all together, leaving a ~3 – 4″ opening at the front of the pouch!

I'm leaving most of the front open. The opening will be there so that we can turn the cover inside out - the fun part! See where the three pins are closer together? That's where my flap is pinned. Juuust a little extra TLC there to make sure it's not moved out of place and actually ends up straight in the end.
Sew using a 1/2″ seam from one pinned end to the other. This is kind of tricky! In the picture below, you’ll see that, since the pouch is so small, there’s no way to get this around the free arm. Instead, you have to sew from the inside, and hold the rest of the pouch off to the side so that you don’t sew the entire pouch together by accident!

You'll want to sew from the inside bottom for this task. It's easier. Just take care to hold the rest of the pouch out of the way so you don't sew it all together! (I've done this. It isn't recommended!)
13. Done? Now turn the pouch inside out!
This is the fun part! It’s like watching a butterfly emerge from its cocoon after eating one apple, two pears, three plums, four strawberries…

Stage 1: shy butterfly shows its lining.

Stage 2: shy butterfly shows its exterior

Stage 3: Shy butterfly gets help from the friendly stick animal to get his lining where it belongs. (What? Change sometimes happens with outside forces involved, right?)
Sanity check: Now that the cover is turned right side out and is almost done, does the iPod touch fit?
Because we’re skeptical by nature, let’s make double sure.

Yup! (Of course it does! You don't think we'd get this far and it wouldn't fit, do you?)
Yup! Fits. Moving on. Time to stitch up that hole and apply our finishing touches!
15. Pin and topstitch.
The back and sides of the top of your iPod Touch cover should be stitched nicely together but you might recall that we left a big opening in the front to allow the butterfly to experience metamorphosis.
Pin that hole shut, making sure that the exterior and lining pieces of fabric at the opening are roughly folded in at about 1/2″ to make a straight line at the front of the pouch. The fabric will naturally want to fold at this spot, since the rest of the pouch has a seam there.
Once you’re pinned, we topstitch! Living on the wild side, we’re topstitching from the inside. Unconventional, yes, but really? The only way this will work…
I topstitch 1/4″ from the top of the pouch. I like to start at the back so that the reinforced (read: slightly unsightly) part of the stitch isn’t right in front.

Take good care to keep the side of the pouch closest to you out of the line of the needle, or you'll be ripping out a seam that sewed the top of your pouch shut!
16. Insert iPod Touch and enjoy!

Phew, that wasn't so bad, was it? Sometimes these tutorials make things look so hard when they're not really so hard! Hope you got through it and have a lovely iPod touch cover to show for it!
I’d love to see pictures of things you make from this tutorial! Please post pictures of your iPod Touch cover in the Dog Named Banjo Tutorials group on Flickr! I’d love to see what you made!
You can find more pictures of the cover-making process not shown here in my Flickr set dedicated to this tutorial.
If you’re among the ranks of the iPod carrying, I’d love for you to share your favorite app with me in the comments of this post! Mine is VegOut – it’ll list all of the closest vegetarian restaurants based on where you are at that moment. What did we ever do before these things?
P.S., if you’re looking to fully outfit your iPod, or if you’re looking for great holiday gifts for your iPod-loving friends, check out my PodPillows on sale at Etsy! They’re great for music and phone devices of all types!
Copyright Dog Named Banjo, 2010. This pattern is strictly for personal use only. You may not sell items made from this tutorial. Thanks!
Posted by robyn on January 13th, 2010 under crafts, sewing, tutorials | 29 Comments »
Orange Wristlet

Don’t we all need a little more orange in our lives? Especially in these more dreary, short-on-daylight days of winter? I know I do, and apparently so does Megan, who will be receiving this wristlet in short order. She is a known lover of orange, as evidenced by other things I’ve made for her, and I hope this one is just as well-received.

I took these pictures with a new camera lens I got for Christmas, care of the ever-thoughtful boy. It’s a 50mm fixed lens that can let in a whole lot more light in a short amount of time, making it perfect for taking pictures indoors on winter weeknights when there’s nary a beam of sun to be found. I’m not thrilled with all of my indoor results quite yet, though I’m still getting the hang of it. There’ll be more experimenting in coming days, and I think pictures will get better as I learn.
Cross your fingers!
Posted by robyn on January 6th, 2010 under crafts, sewing | 3 Comments »Resolutions, crafts of a different kind, and a new bike stand!

Yesterday was dedicated to crafts, but much different than the quilting, sewing, and baking that I’ve been so fond of the last couple of weeks. I made strides towards fulfilling my first New Year’s resolution, which is to become a better bike mechanic. I spent most of Saturday building this DIY bike stand for repairs to make it happen. (Better bike mechanic is all relative, by the way. Heck, I’d settle for “learn to fix the easy things and stop throwing my money away at the Local Bike Store.” I think that’s obtainable in 2010, don’t you?)
So far so good.

(First order of business? Turn that pesky reflector around.)
Anyway, this thing is about 5 feet tall for easy access to all the moving parts without getting on your hands and knees.

Pictures aren’t great, because it was blustery, windy and snowing today when I took these, so everything is relegated to my over-cluttered disorganized garage with bad light. Goodness knows I wasn’t leaving the house. Above is Ryan’s bike on the stand.

This is the clamp that makes it all work. It involved a drill press, some table sawing, and drilling through metal to make this little doohickey. It was a fun little project that I’m proud of, and made me feel like I was in 8th grade woodworking class again. Even though the thing is on the clunky side (and definitely in the “inelegant” category…), it should get the job done!
What are your resolutions this year? Anything crafty (or otherwise)? I’d like to hear about them! In the meantime, I hope your 2010 is going along swimmingly so far.
Posted by robyn on January 3rd, 2010 under crafts, random | 4 Comments »Homemade soft pretzels

Vacation has been good to me. I’ve had lots of time to bake cookies, cakes, and most recently, these delicious homemade soft pretzels.
Some of you may know that I adore soft pretzels. I started my affair when living in Germany, where every bakery would sell them fresh and delicious. It’s also a welcome treat at a Red Sox game. I know, I know… at $4.50 it’s such a rip-off, but it’s the experience I look forward to more than the food. And for a non-Fenway-Frank-eating vegetarian, it’s something to stave off the between-inning hunger, you know? And with that yummy yellow mustard? I can’t help myself.
Anyway, I discovered today that soft pretzels are incredibly easy and fun to make, and within about 2 hours (most of that in the rising or baking time), you can be munching on your own. I used Alton Brown’s Homemade Soft Pretzel recipe.
Here’s a close-up!

The recipe makes 8 pretzels in all, but I made 4 pretzels and 4 rolls (I do love a good pretzel roll!) The salt is course sea salt, lovingly procured by my husband yesterday as my obsession was forming. I love being able to put on my own amount of salt – I’m generally a big salt fan, but not so much of the overwhelming amounts of salt on pretzels sometimes.
I will be making these again (and again, and again)!
Posted by robyn on December 30th, 2009 under cooking, crafts | 11 Comments »Finished Hope Valley Quilt

I finished the Hope Valley quilt I was working on, and it’s been successfully gifted to its recipient for Christmas! I managed to use a bit of each of my fat quarters from the entire line, plus a bunch of stash solids and other patterns in similar colorways. I ended up using ivory sashing and a grey back with a teal binding.

Here’s the new quilt just chillin’ beneath my (Inside A Black Apple) porcupine prints, which I adore:

Here’s the front:

I think the back is my favorite of all! I’m loving the light gray, and blues combo:

Hope all of you that celebrate Christmas had a great one! We just returned from a trip to Maine that was lovely as always and featured excellent company, awesome food (including as many, many sweets), an entertaining 3-year-old with a train obsession, fun present-giving and -receiving, and an all-around rejuvenating, relaxing time.
Tonight we got home and went to see Sherlock Holmes, which was witty and cute and felt all blockbustery with its filming and costumes and sets. I now desire a stagecoach, two horses, and my very own cobblestone street to ride on. Guess I have something to wish for for next Christmas!
Posted by robyn on December 28th, 2009 under crafts, sewing | 20 Comments »Quilt in Progress (or, Ode to Freezer Paper)

I mustered up the courage to cut into my new fat quarter pack! In fact, I’ve managed to leave myself mostly with scraps left over, after working hard to create some blocks for a new quilt. Above are a bunch of pieces that will become blocks over the next few hours… if my back holds up. Sometimes sewing and cutting gets my back all sorts of angry at me. This week has been one of those spells that leaves me moaning and groaning. Ick. I need better posture!
Anyway, I’m using Oh, Fransson’s Map of the States technique to make blocks in these colorways:


I have long known of the craft wonders of freezer paper, but this is my first time actually using it for anything. And I am impressed! It is full of awesomeness I’ve never known. It irons on to the front of fabric – for stenciling, or in my case, block cutting – and the true beauty of it is that it’s temporary! And leaves no marks behind! And it’s reusable! Meaning that if you ironed it on to one piece of fabric, peeled it off and then thought… shoot, I’d like to do that again, ’cause it was that fun, YOU CAN!
I sense more freezer paper in my life in the coming months. Might be a good time to buy stock in Reynolds. I’m just saying.
Posted by robyn on December 22nd, 2009 under crafts | 3 Comments »Handmade High Tech

I'm Robyn. Thanks for stopping by! This is my craft blog.
Contact me at robyn [at] dognamedbanjo [dot] com.